
How to Add WooCommerce Products to Invoices
Running a WooCommerce store means you’re already managing a product catalogue with names, descriptions, prices, and quantities. Yet when it comes time to send a client invoice, most store owners are forced to leave WordPress entirely, open a separate invoicing tool, manually retype the product details, and hope nothing gets lost in translation. The result is wasted time, billing errors, and an unprofessional experience that can erode client trust.
There is a better way. With Direct Invoices, a WordPress invoicing plugin, you can pull your existing WooCommerce products directly into professional invoices without ever leaving your dashboard. In a few clicks, your product catalogue becomes a billing catalogue, complete with quantities, pricing, taxes, and payment options all in one place.
This guide will show you exactly how to do that step-by-step and explain why this workflow is a smart move for any WooCommerce store owner who also invoices clients.
What Is Direct Invoices?
Direct Invoices is a WordPress plugin built to help businesses create, manage, and send professional invoices directly from the WordPress dashboard. Unlike standalone invoicing software, the plugin works inside WordPress itself, allowing it to connect seamlessly with WooCommerce and automatically access your existing product catalogue. This makes it easier to generate invoices using your store’s products, pricing, and quantities without repetitive manual entry.
The plugin enables businesses to create clean, branded PDF invoices that clients can download and keep for their records. It also supports more than 100 payment methods, including Bank Transfers, crypto, mobile money, and P2P payment accounts, allowing customers to pay businesses directly without transaction fees. To improve payment collection, Direct Invoices automates invoice reminders before and after due dates and supports invoice delivery through WhatsApp and Telegram, helping businesses reach customers faster and reduce payment delays. It also includes recurring invoice functionality, making it suitable for retainers, subscriptions, and ongoing service agreements.

What You Need Before Getting Started
To follow this guide and add WooCommerce products to your invoices, make sure you have the following in place:
- A WordPress website with WooCommerce installed and configured.
- At least one WooCommerce product has been added to your store (simple products work best).
- The Direct Invoices PRO plugin was purchased and installed from here
- Your license key is activated inside the plugin settings.
- At least one payment account is configured under Invoice → Settings → Payment Methods.
How to Add WooCommerce Products to Invoices: Step-by-Step
The process involves five key stages: setting up Direct Invoices, creating a new invoice, adding WooCommerce products as line items, adding invoice options, and then saving and sending the invoice.
Let us walk through each one.
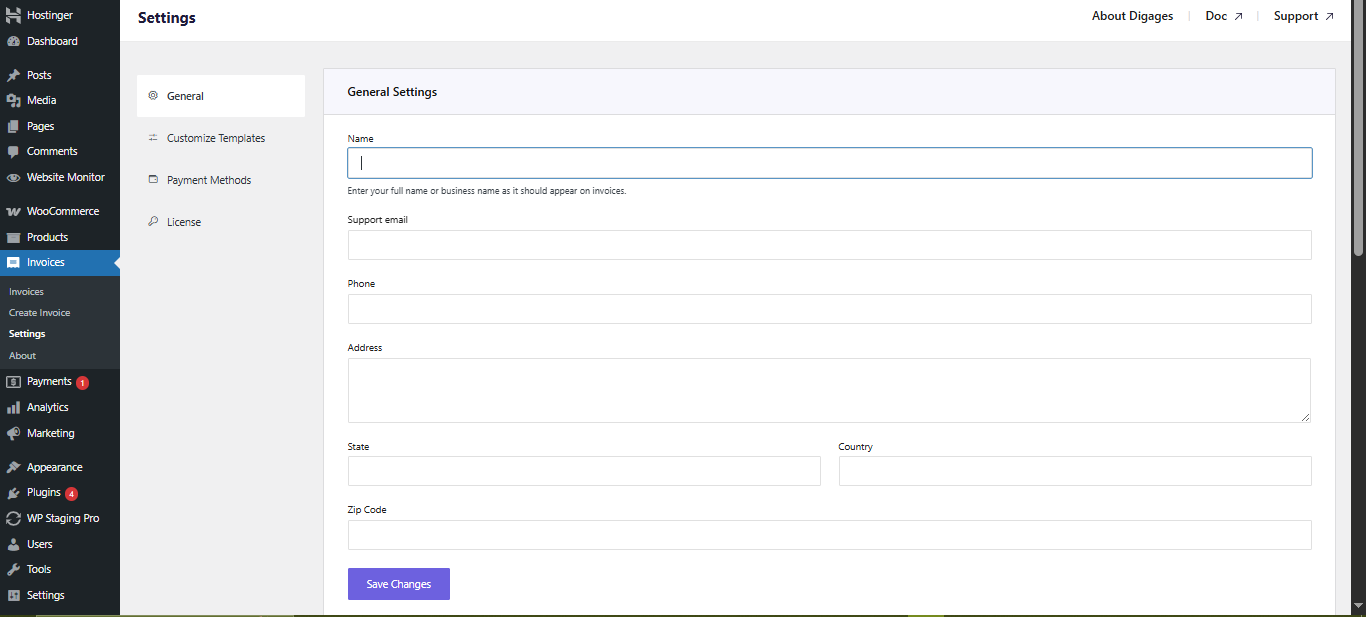
Step 1: Configure Your Invoice Settings
Before creating invoices, spend a few minutes setting up your business details. Go to Invoice → Settings → General and fill in your business information. These fields appear on every invoice you send.
In the Invoice Preferences section, configure:
- Default currency (or enable multi-currency for international clients)
- Starting invoice number (useful when migrating from another system)
- Automatic reminder settings — days before and/or after the due date
- Your business logo for branded PDFs
- Enable “Send Receipt After Completion” to automate client receipts
Next, go to Invoice → Settings → Payment Methods. Click Add Account and configure at least one payment method (bank transfer, crypto wallet, mobile money, or any other supported option). You can also use the Sync option if you already use Direct Payments for WooCommerce, which will automatically import your existing payment accounts.
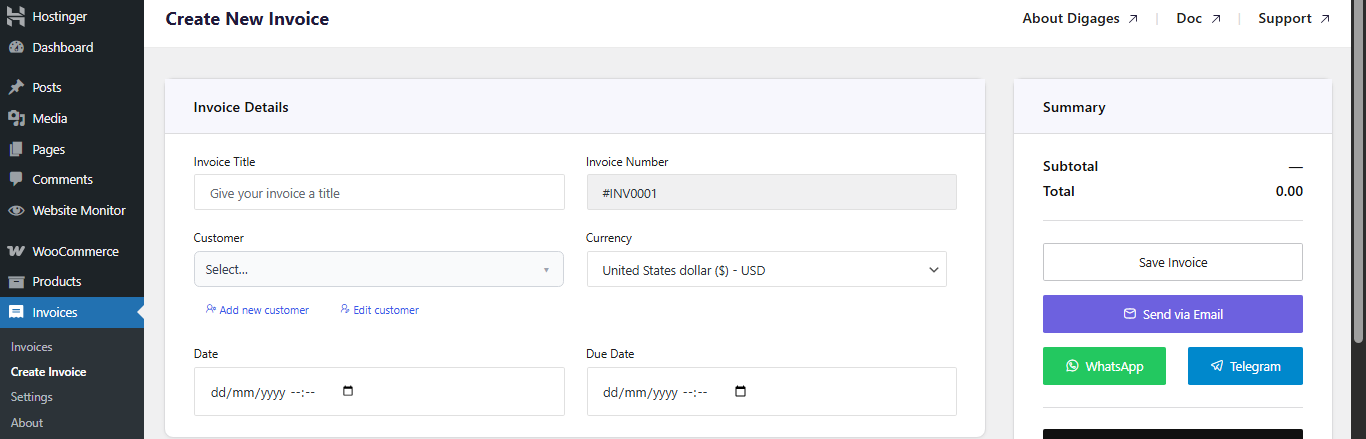
Step 2: Create a New Invoice
Go to Invoice → Create Invoice. You will land on the invoice creation screen, which is divided into four sections: Invoice Details, Invoice Items, Invoice Options, and Invoice Summary.
Fill in the Invoice Details section:
- Invoice Title: A reference label such as “Product Order – May 2026”.
- Customer: Click Add Customer to enter or search for the client’s name and contact details.
- Currency: Select the billing currency for this invoice.
- Invoice Date and Due Date: Always set a due date (this is what triggers automated payment reminders).
Step 3: Add WooCommerce Products as Invoice Items
This is the core step of the entire guide, where your WooCommerce catalog connects to your invoicing workflow.
Scroll to the Invoice Items section. Click Add Item. You will see a toggle or dropdown that lets you choose between a Custom service or a WooCommerce product.
To add a WooCommerce product:
- Select WooCommerce product from the item type options.
- Search for or browse your product catalog. Direct Invoices connects to WooCommerce and surfaces your existing products.
- Select the product. The product name and price populate automatically from WooCommerce.
- Set the Quantity. The line total calculates automatically.
- Repeat this process to add multiple products to the same invoice.
You are not limited to WooCommerce products. you can mix and match by adding both WooCommerce products and custom service line items on the same invoice. This is particularly useful when you are selling a product bundle with an installation or consulting service.

Step 4: Add Invoice Options
With your line items set, scroll to the Invoice Options section to fine-tune the invoice financials and delivery settings.
Tax: Add a percentage-based tax rate. This is applied to the subtotal and itemised on the PDF.
Discount: Apply a fixed amount or percentage discount to the total. Ideal for loyal clients, bulk orders, or promotional pricing.
Recurring Invoice: If you supply products on an ongoing basis (monthly restocking, subscription boxes, SaaS bundles), enable the recurring option and set an end date.
Payment Account: This is critical. Select which payment account(s) the customer should use to pay. Without this step, the invoice will not include payment instructions.
Notes: Add any customer-facing notes, such as delivery timelines, terms of service references, or special instructions for the order.

Step 5: Save and Send the Invoice
When everything looks correct, go to the Invoice Summary panel in the top-left area of the screen.
- Click Save Invoice. This finalises the invoice and makes it sendable.
- Choose your delivery channel: Email, WhatsApp, or Telegram.
- Optionally, download the PDF for your own records or to attach to an external message.
Your client will receive a branded invoice that includes all the WooCommerce product details, pricing, due date, and payment instructions. They can view the invoice online, choose a payment method, and pay, all without you needing to chase them.
Conclusion
Managing invoices separately from your WooCommerce store creates unnecessary work, increases the risk of billing mistakes, and slows down your payment process. By connecting your WooCommerce product catalogue directly to your invoicing workflow, Direct Invoices eliminates repetitive manual tasks and allows you to create accurate, professional invoices directly inside WordPress.
Instead of copying product names, prices, and quantities into external invoicing tools, you can pull WooCommerce products directly into invoices in just a few clicks. Combined with automated reminders, recurring billing, multi-currency support, and direct payment options, this creates a faster and more streamlined invoicing system for both store owners and clients.
Whether you run a WooCommerce store that sells physical products, digital downloads, subscriptions, or service packages, Direct Invoices helps turn your existing product catalogue into a complete billing solution. The result is less admin work, faster invoice delivery, improved payment collection, and a more professional customer experience from start to finish.
Direct Invoices lets you keep 100% of your revenue with no transaction fees or hidden costs. Give your business/online store the freedom to accept payments professionally, all set up in under 10 mins.