✨ New in v2.4: AI Powered Payment Confirmation & Custom Workflow Controls.
In this article
- 1. Step 1: Install and Activate PRO
- 2. Purchase
- 3. Installation
- 4. License Activation
- 5. Step 2: Configure Invoice Settings
- 6. Set Up General Invoice Details
- 7. Add Payment Methods
- 8. Step 3: Create and Send an Invoice
- 9. Add Invoice Details
- 10. Add Invoice Items
- 11. Configure Invoice Options
- 12. Save and Send the Invoice
- 13. Frequently Asked Questions (FAQ)
Direct Invoices is a WordPress invoicing plugin that allows you to create professional invoices, send them via email, WhatsApp, or Telegram, and automate payment reminders directly from your dashboard.
This guide walks you through installing the plugin, configuring invoice settings, and creating and sending invoices step by step.
Step 1: Install and Activate PRO
Purchase
To get started, you’ll need to visit our Direct Invoices page. This page shows all the features available with our paid license levels. Pick one that suits your needs.
-
Select your preferred PRO plan.
-
Click Get Started to begin checkout.
After successful payment:
-
You will be redirected to the download page.
-
You will receive an email containing the plugin ZIP file download link.
If the download or license key is missing after payment, create a Support Ticket with Digages, and our team will respond within 24 hours.
Installation
After you have downloaded the Direct Invoices PRO Zip file
-
Log in to your WordPress admin dashboard.
-
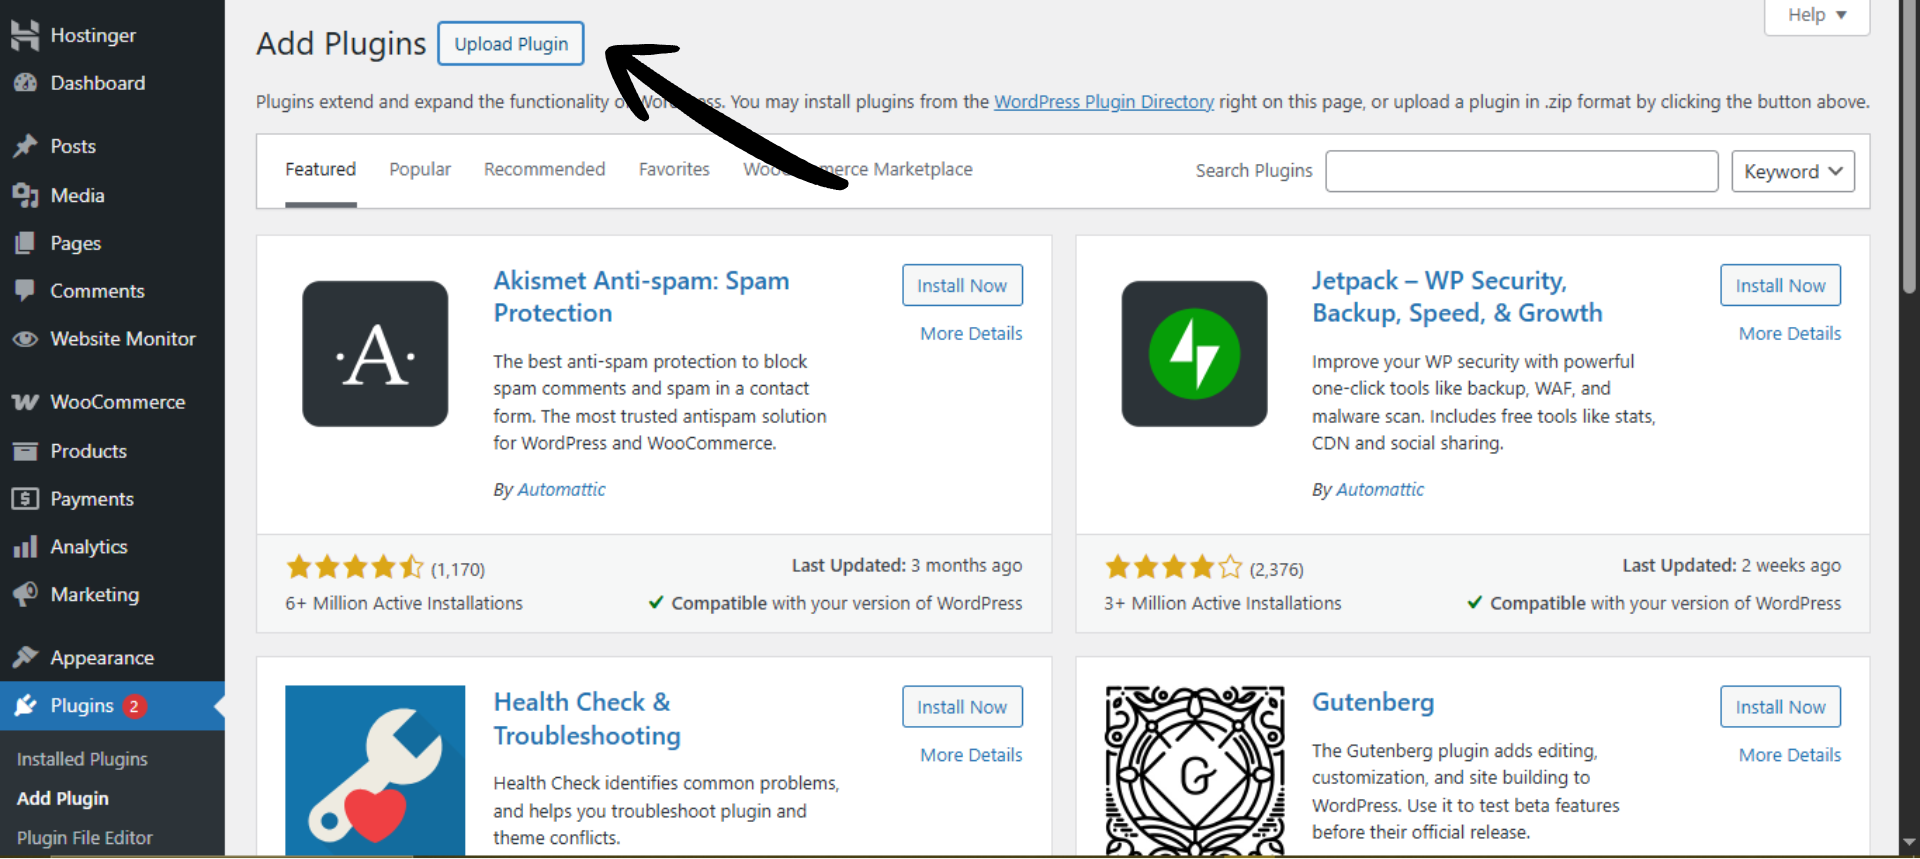
Navigate to Plugins → Add New.
-
Click Upload Plugin → Choose File, then select the Direct Invoices PRO Zip file you downloaded.
-
Click Install Now and activate the plugin.
WordPress will automatically upload and unpack the plugin files during installation.
After activating the plugin, a new Invoice menu will appear in your sidebar.
License Activation
Activating your license enables all PRO features, automatic updates, and support access.
-
On your WordPress dashboard, go to Plugins → Direct Invoices.
-
Open the License tab.
-
Paste your license key (from your Digages dashboard).
-
Click Activate License.
Once activated, all PRO features become available immediately.
Step 2: Configure Invoice Settings
Before creating invoices, you should configure your business details and preferences.
Set Up General Invoice Details
- Go to Invoice → Settings → General
- Under General Settings, fill in: Full Name or Business Name, Support Email, Phone Number, and Business Address.
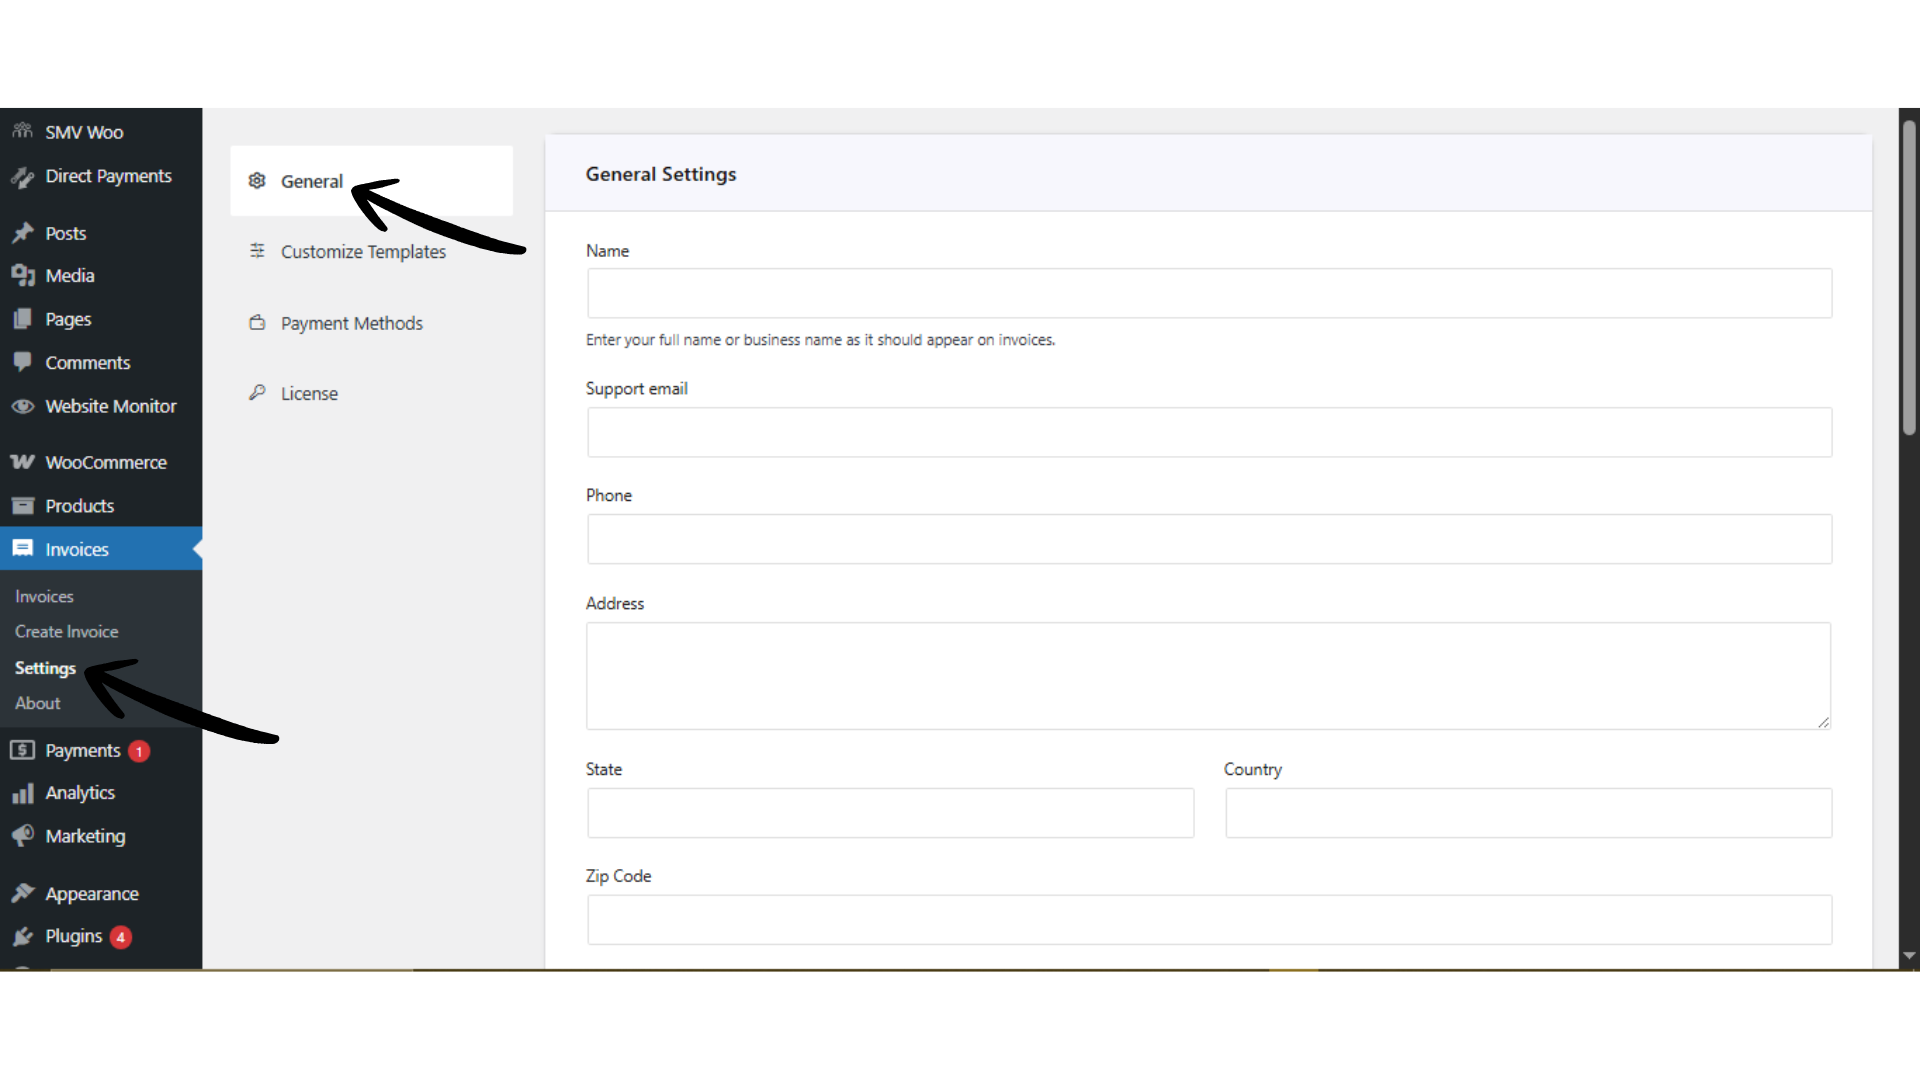
- Under Invoice Preferences, configure: Currency (or Multiple Currencies if supported), Starting Invoice Number, Logo (for branding your invoices), Payment Instructions (e.g., bank transfer details). Automatic Reminder Settings: Days before due date, Days after due date, and Enable Send Receipt After Completion (optional).
 This setting defines how your invoices look and how customers interact with them.
Add Payment Methods
- Go to Invoice → Settings → Payment Methods
- Click Add Account
- Fill in your payment details (e.g., bank account, payment provider)
- Save the account
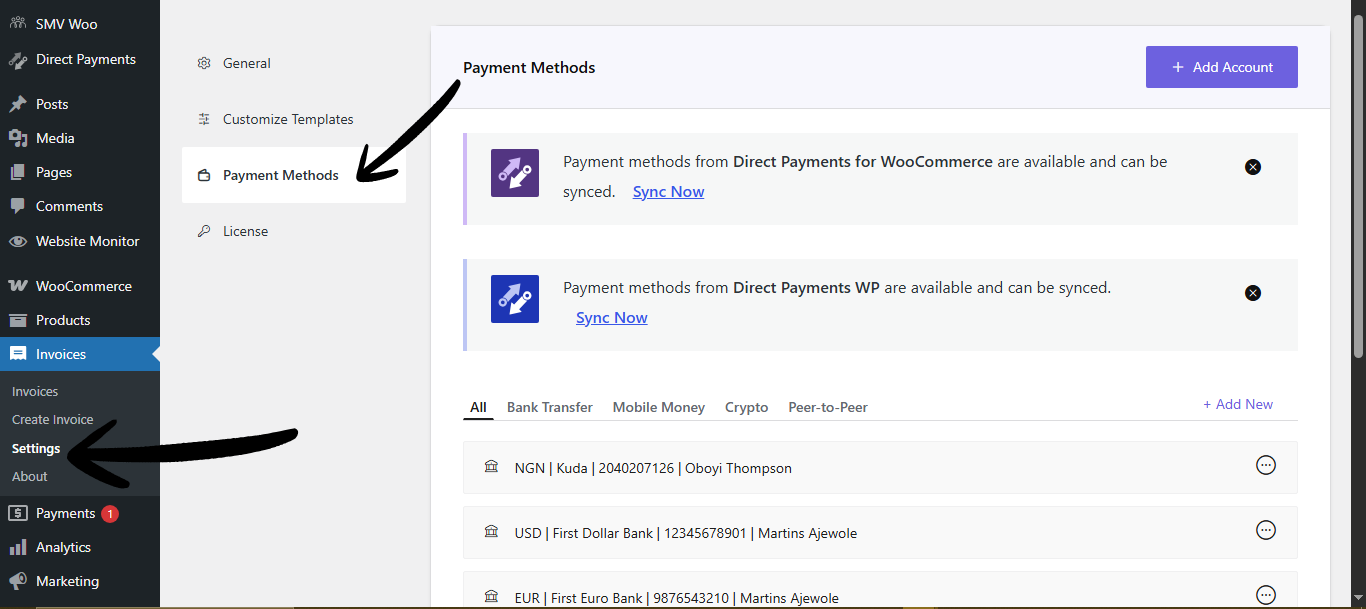
These accounts can later be attached to invoices so customers know how to pay.
Step 3: Create and Send an Invoice
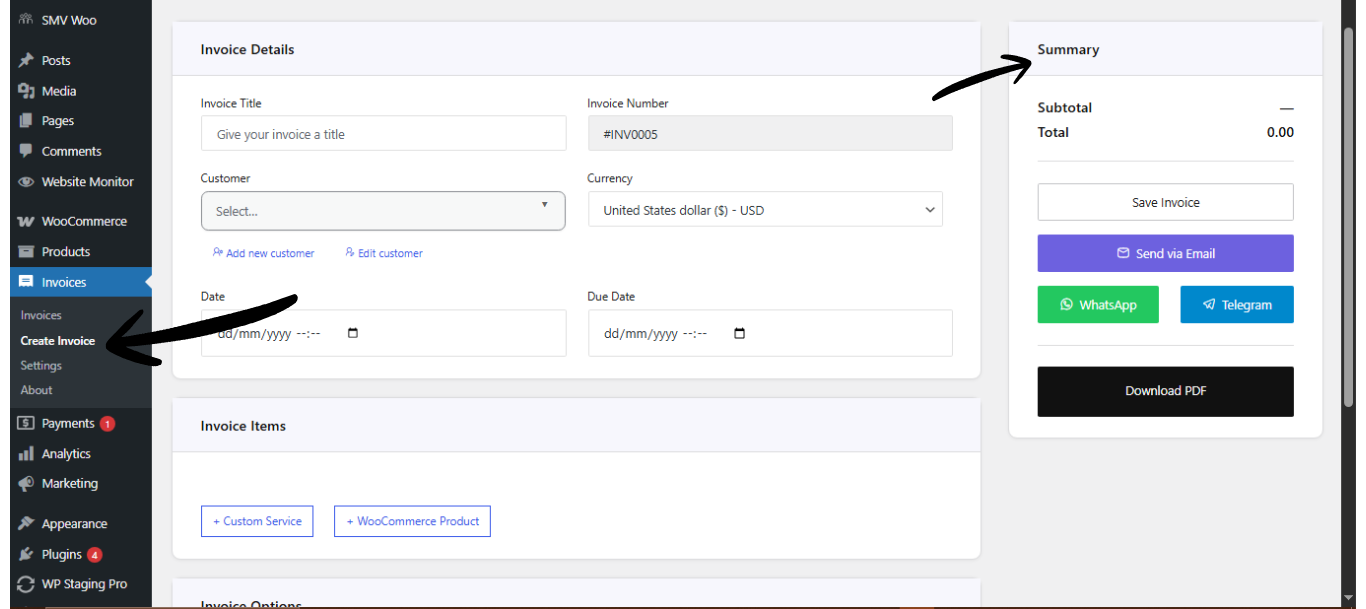
Add Invoice Details
To do this;
- Invoice → Create Invoice → Invoice Details
- Then Enter: Invoice Title, Click Add Customer to input customer details, Select Currency, Set Invoice Date, and Set Due Date
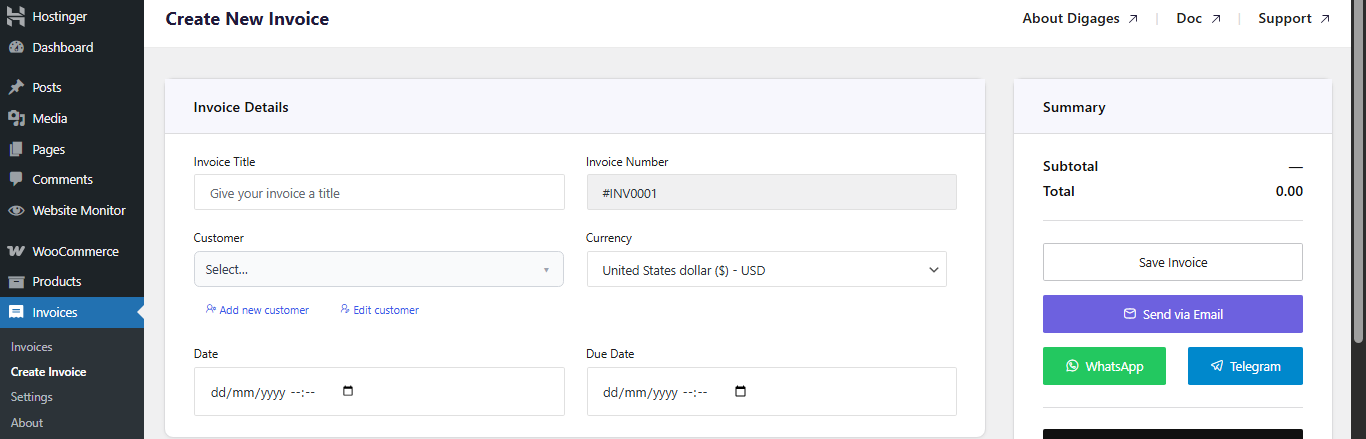
Always set a due date to enable automated reminders.
Add Invoice Items
- Go to the Invoice Items section
- Then add item: Custom service or WooCommerce product, Quantity, and Rate

This defines what the customer is being billed for.
Configure Invoice Options
- Go to Invoice Options
Then configure (as needed):
- Add Tax (percentage)

- Add Discount (fixed or percentage)

- Enable Recurring Invoice (if needed, set the end recurring date)

- Select Payment Account(s)

This is a very important step; if this step is omitted, the invoice would not carry payment account(s)
- Add a Note(s) for the customer

Save and Send the Invoice
- Go to Invoice Summary (top left area)
- Click Save Invoice (this creates the invoice and allows you to send it)
- After saving, choose how to send the invoice: via Email, WhatsApp, or Telegram
- You can also download the invoice as a PDF.
Tip:
Sending invoices via WhatsApp or Telegram often results in faster responses compared to email alone.
Frequently Asked Questions (FAQ)
Can I send invoices via WhatsApp from WordPress?
Yes. Direct Invoices by Digages allows you to send invoices via WhatsApp, email, and Telegram directly from your dashboard. This helps improve response rates compared to email-only delivery.
Can I automate invoice reminders?
Yes. You can configure automatic reminders for all invoices based on the invoice due date. Set how many days before and after the due date reminders should be sent in Invoice → Settings → General → Invoice Preferences.
Do I need WooCommerce to use Direct Invoice?
No. The plugin works independently. However, you can optionally use WooCommerce products as invoice items if you already have a product catalog set up in WordPress.
Can I create recurring invoices?
Yes. You can enable recurring invoices when creating an invoice and define how often it repeats and when it should end. This is useful for subscriptions, retainers, or ongoing services.
What payment methods can I add to invoices?
You can add Multiple Payment Methods, such as Bank Transfers, crypto, peer-to-peer (P2P), and mobile money payment methods. These are configured under Invoice → Settings → Payment Methods and can be attached to each invoice.
Can I use Multiple Currencies?
Yes. If multi-currency is enabled, you can select different currencies when creating invoices. This is useful for businesses serving international clients.
Will customers receive a copy of the invoice automatically?
Yes. When you send an invoice, the customer receives it via the selected channel (email, WhatsApp, or Telegram). You can also enable automatic payment receipts after successful payment.
Can I download invoices as PDF files?
Yes. Each invoice can be downloaded as a PDF. This is useful for record-keeping, sharing offline, or attaching to external communications.
Can I customize invoice messages and templates?
Yes. You can customize email, WhatsApp, and Telegram templates under Invoice → Settings → Customize Templates. It is recommended to keep formatting simple to ensure readability across devices.
Can I add taxes and discounts to invoices?
Yes. You can apply taxes and discounts (fixed or percentage) when creating an invoice. These are calculated automatically in the invoice summary.
Is Direct Invoice suitable for freelancers and agencies?
Yes. It is designed for freelancers, agencies, and small businesses that need a flexible invoicing solution directly inside WordPress.
Is there a limit to the number of invoices I can create?
No. You can create and send as many invoices as needed, depending on your hosting capacity and site performance.