🎁 New: Build Customer Loyalty & Drive Repeat Purchases with WooCommerce. Learn more



On this page
- Introduction
- Why Default WordPress Roles Don't Work for Client Access
- What Clients Actually Need Access To
- How to Build Client Roles with Digages Role Manager
- 4 Ready-Made Client Role Configurations
- Protecting Your Agency's Work with Audit Logging
- Common Mistakes Agencies Make With Client Access
- Best Practices for Agency Client Access Management
- Conclusion
How Agencies Can Safely Give Clients Limited WordPress Access
You finish a project, hand over the WordPress site, and two weeks later your client calls. They’ve accidentally deleted the hero section of the homepage. Or installed a plugin that broke the checkout. Or changed a permalink structure that quietly invalidated every URL on the site.
This is the access problem every agency faces. And the good news is it’s entirely solvable. Giving clients limited WordPress access doesn’t have to mean choosing between locking them out completely or handing them unchecked control over your carefully built site.

This guide walks through how to design client-specific roles that give your clients exactly what they need – content updates, order management, or basic settings – without the ability to break anything that matters. It uses Digages Role Manager, a WordPress plugin built for precisely this kind of access control.
Why Default WordPress Roles Don't Work for Client Access
WordPress’s built-in role system was not designed with the agency-client relationship in mind. The default roles: Administrator, Editor, Author, Contributor, and Subscriber each come with a rigid set of capabilities that rarely map cleanly to what a real client actually needs.
The Editor role, often used as the go-to for clients, grants more access than most clients need. An Editor can delete any post on the site, including content written by your team. They can manage categories and tags across the entire site. On a WooCommerce store, they have no useful e-commerce access at all without a separate plugin.
Administrator is obviously too broad, it gives clients the power to install plugins, delete users, change your carefully configured settings, and even remove your agency’s own access. Even if your client would never do this intentionally, accidents happen.
The result is that most agencies end up defaulting to one of two bad options: give the client Editor access and hope they don’t break anything, or give them full Administrator access because it’s the only way to let them do what they need. Neither approach is professional, and neither protects your work.

What Clients Actually Need Access To
Before building a client role, it helps to think clearly about what your client actually does and doesn’t do on their site. Most client access needs fall into a handful of predictable categories.
Content Management Clients
These clients manage a blog, news section, or resource library. They need to create, edit, and publish posts. They may also need to upload images to the Media Library. They do not need access to theme settings, plugins, or any other user accounts.
WooCommerce Store Clients
These clients run a shop and need to manage orders, update product details, and occasionally check sales reports. They do not need access to payment gateway settings, shipping configurations, or plugin management. WooCommerce adds its own set of capabilities that can be assigned granularly, separate from WordPress core permissions.
Reporting and View-Only Clients
Some clients just want visibility. They want to log in, check their analytics dashboard or WooCommerce sales overview, and log out. They don’t need to edit anything; they just want a window into how their site is performing.
Mixed-Function Clients
Larger clients often need a combination: the marketing manager updates the blog, the ops team manages orders, and the director wants to see reports. Each of these is a separate role, and building them correctly means no single person has more access than their job requires.
How to Build Client Roles with Digages Role Manager
Digages Role Manager gives you a dedicated interface to create exactly the roles your clients need, without writing a line of PHP. Here’s how to approach the process for each client type.

Step 1: Map the Client’s Workflow Before You Build
Before opening Digages Role Manager, write down, even informally, what the client will actually do when they log in. What pages will they visit? What actions will they take? What should they never be able to touch? This 60-second exercise prevents you from having to rework the role after it’s been assigned.
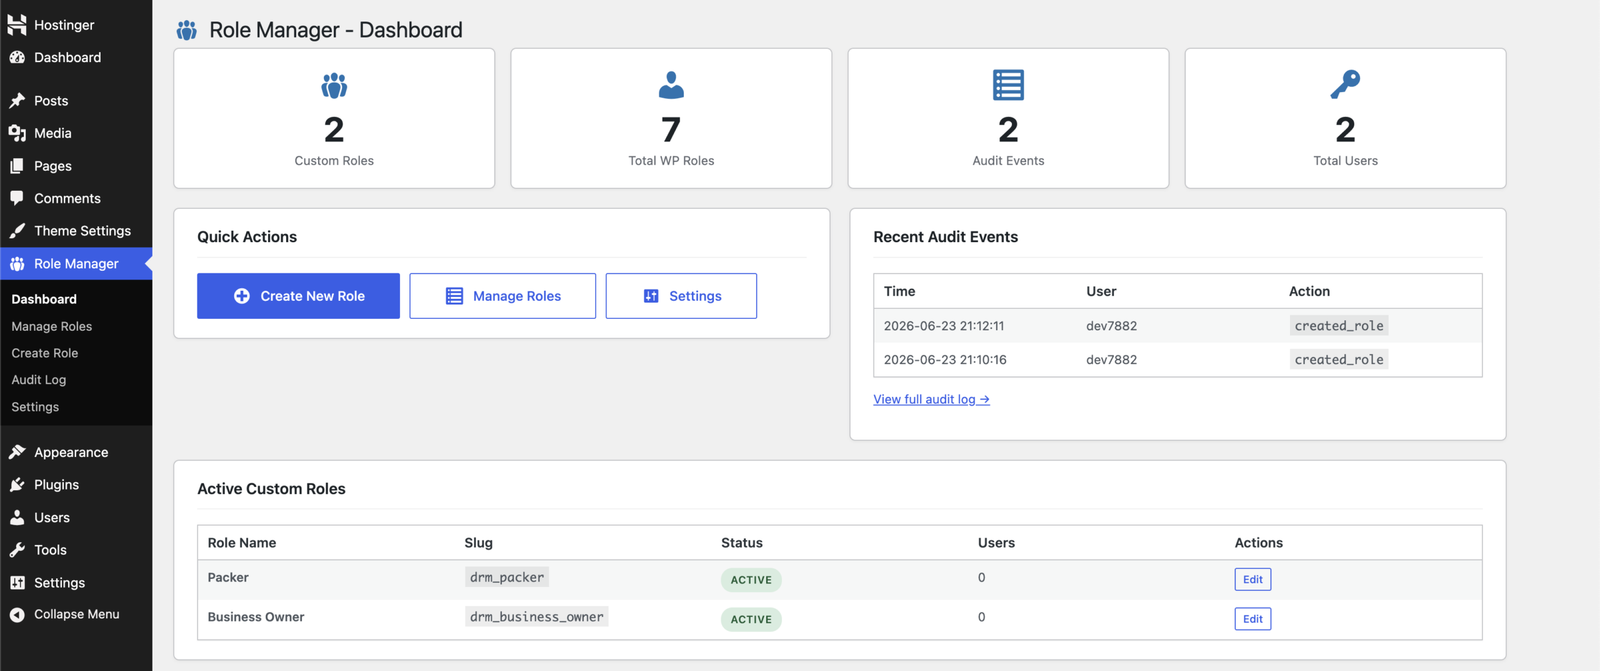
Step 2: Create a New Role from the Digages Role Manager Dashboard
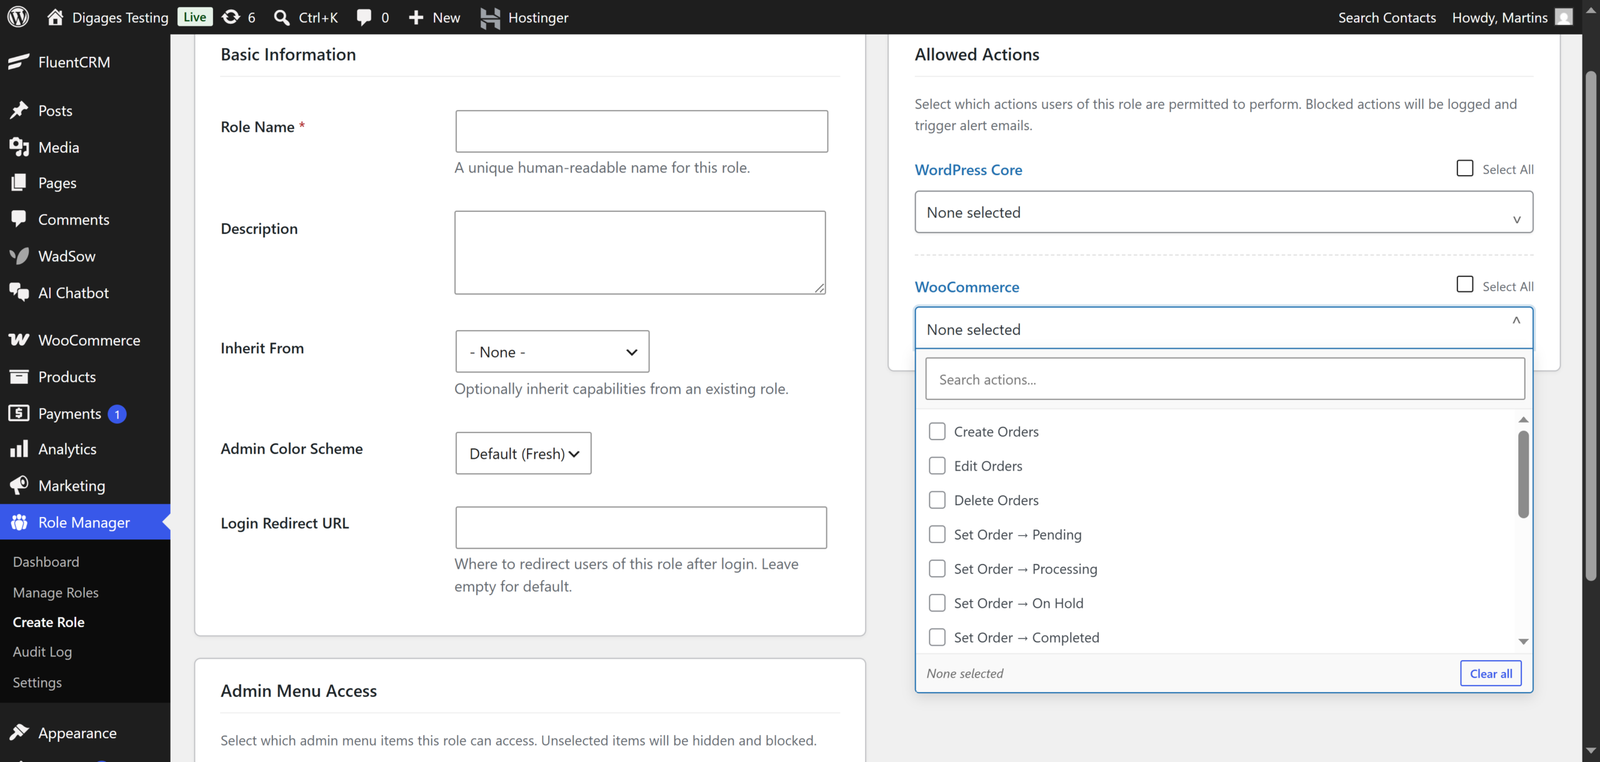
In the WordPress sidebar, navigate to Digages Role Manager and click Create New Role. The creation screen is split into two areas: Basic Information on the left and Allowed Actions on the right.
- Give the role a clear, client-relevant name. “Content Client — Bright Ideas Ltd” or “Orders Access — Store Owner” is far more useful than “Custom Role 3” when you’re managing multiple clients on a multi-site setup.
- Add a description. Even a one-line note — “Client role for blog post updates only; no plugin or settings access” — will save time if you revisit the site in 12 months.
- Choose whether to inherit from an existing role. For most client roles, starting from None gives you the cleanest foundation. If the client needs fairly broad content access, inheriting from Editor and stripping out the capabilities you don’t want can be faster.
Step 3: Set a Login Redirect URL
The Login Redirect URL field in Digages Role Manager is one of the most underused features for agency setups. When a client logs in, by default they land on the WordPress admin dashboard — a screen filled with controls they’ll never use and which can cause confusion or accidental clicks.
Set the redirect URL to the exact screen where the client will do their work. For a content client, this might be /wp-admin/edit.php (the Posts list). For a WooCommerce client, /wp-admin/admin.php?page=wc-orders puts them directly on the Orders screen the moment they log in.
A focused login experience reduces client confusion, reduces accidental changes, and reduces the number of support calls you receive. It’s a small configuration that makes a noticeable difference.
Step 4: Assign WordPress Core Capabilities
In the Allowed Actions panel, the WordPress Core Capabilities section lists every standard WordPress permission. For most client roles, you’ll only need a small subset. Here’s what typical client types need:
Content Editor Client; read, edit_posts, edit_published_posts, upload_files, publish_posts
Content Editor (Can Edit Others’ Posts); read, edit_posts, edit_others_posts, edit_published_posts, upload_files
View-Only / Reporting Client; read
WooCommerce Store Client; read. WooCommerce-specific capabilities handle store management permissions
Full Content + Orders Client; read, edit_posts, upload_files, publish_posts. Full WooCommerce capability set for order management and store operations
Resist the urge to check “Select All” for WordPress Core Capabilities. This is equivalent to granting near-administrator access and defeats the purpose of creating a custom role. Start with read and add only what the client’s workflow genuinely requires.
Step 5: Assign WooCommerce Capabilities (If Applicable)
If your client’s site runs WooCommerce, a separate WooCommerce section appears below the WordPress Core section in Digages Role Manager, but only when WooCommerce is active on the site. This section lets you assign e-commerce-specific permissions completely separately from the WordPress core set.
For a store-owner client who manages orders and checks reports, the right capabilities are typically edit_shop_orders and view_woocommerce_reports. These two capabilities give full visibility and processing access for orders and sales data, without touching payment gateway settings, product configuration, or store-wide options.
Step 6: Configure Admin Menu Access
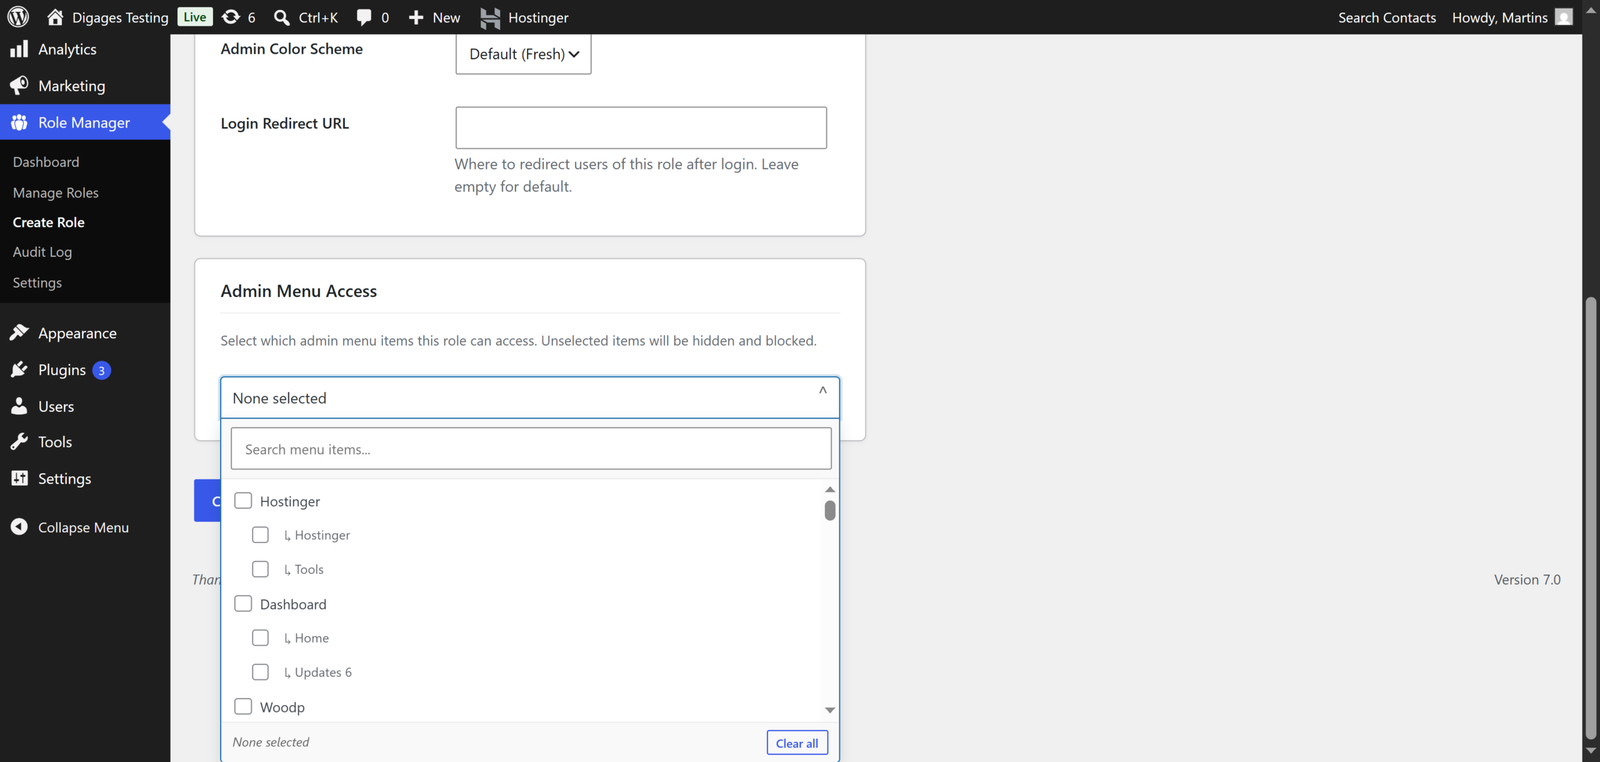
The Admin Menu Access section is the second major layer of protection in Digages Role Manager, and it works independently of the capability settings. Even if a capability is technically assigned, if the corresponding menu item isn’t enabled here, the user won’t see it in their admin panel at all.
For a content client, you might enable only Posts, Pages, and Media. For a WooCommerce client, WooCommerce > Orders and nothing else. For a reporting client, only the analytics or reporting menu items from whatever plugins are installed.
4 Ready-Made Client Role Configurations
These are practical starting-point configurations you can build immediately in Digages Role Manager. Adjust them based on your specific client’s needs.
Role 1: Blog Content Client
For clients who publish articles, news posts, or resources on their site.
- Inherit from: None
- WordPress Core Capabilities: read, edit_posts, edit_published_posts, publish_posts, upload_files, delete_posts
- WooCommerce Capabilities: None
- Admin Menu Access: Posts, Media
- Login Redirect: /wp-admin/edit.php
- Description: Client role for blog management only. No access to pages, settings, plugins, or other users.
Role 2: WooCommerce Store Owner Client
For clients who need to manage orders, view reports, and keep their product catalogue updated.
- Inherit from: None
- WordPress Core Capabilities: read, upload_files, edit_posts, edit_published_posts
- WooCommerce Capabilities: edit_shop_orders, view_woocommerce_reports, edit_products, publish_products
- Admin Menu Access: WooCommerce (Orders, Products, Reports) — no WooCommerce Settings
- Login Redirect: /wp-admin/admin.php?page=wc-orders
- Description: Store owner access for day-to-day operations. Cannot change payment gateways, shipping, or store settings.
Role 3: View-Only Reporting Client
For clients who only need visibility, a director or stakeholder who logs in to check performance.
- Inherit from: None
- WordPress Core Capabilities: read
- WooCommerce Capabilities: view_woocommerce_reports (if applicable)
- Admin Menu Access: WooCommerce > Reports, or your analytics plugin’s menu page
- Login Redirect: Direct URL to the reporting dashboard page
- Description: Read-only reporting access. Cannot create, edit, or delete any content.
Role 4: Full-Site Content Manager Client
For trusted clients who manage a large content site and need broader editorial control — but still should not touch technical settings.
- Inherit from: Editor
- Remove from inherited: delete_others_posts, delete_published_posts, delete_pages, manage_categories
- Admin Menu Access: Posts, Pages, Media — no Appearance, Plugins, Settings, or Users access
- Login Redirect: /wp-admin/edit.php
- Description: Broad editorial access for trusted content managers. Deletion of others’ content and category management are disabled.
Protecting Your Agency's Work with Audit Logging
One of the most overlooked benefits of Digages Role Manager for agencies is the Audit Log. When something goes wrong on a client’s site, and eventually, something always does, the first question is usually who did what and when.
Digages Role Manager’s Audit Log records every role-related action on the site: when a role is created, edited, or deleted; when a user’s role changes; and when a restricted action is attempted. Each entry includes a timestamp, the username, the type of action, and the IP address.
For agencies, this has two practical uses. First, it’s a forensic trail if a client claims their access configuration was changed without their knowledge; you can demonstrate exactly what happened and when. Second, it catches the early signs of a client trying to access areas outside their role, whether out of curiosity or because their workflow has changed and they genuinely need more access.
Setting Up Alert Emails for Client Sites
In Digages Role Manager’s Settings page, you can enter one or more email addresses that receive an alert any time a restricted action is attempted. For agency setups, this is worth configuring with both the site admin email and your agency’s monitoring address.
If a client tries to access a plugin settings page, the user management screen, or any other area their role blocks, you’ll receive an email immediately. More often than not, this is simply a signal that the client needs a slightly different level of access, and it’s far better to find out via an alert than via a broken site.
Example: An agency running a WooCommerce site for a retail client configured the store owner with order management access only. When the client started receiving alert emails showing blocked attempts to access the Appearance menu, they realised the client needed to be able to update a simple banner image. A quick role edit, adding Media Library and a specific Appearance panel, resolved it without any drama.
Common Mistakes Agencies Make With Client Access
Giving Admin Access “Just for the Handover”
The handover period is when agencies are most likely to make access mistakes. You give the client full admin access temporarily so they can review the site, and then forget to change it. Build the correct custom role before the handover, not after.
Creating One Generic “Client” Role for All Clients
Different clients have different needs. A content blog client and a WooCommerce store client need fundamentally different permissions. Creating a single catch-all client role either over-grants or under-grants access for at least one of them. Take the extra ten minutes to build role variants for different client types.

Forgetting to Revoke Access After Project Completion
Former clients, especially those who have moved to another agency, should have their access reviewed and updated. An ex-client with active editor or admin access to their old site is an ongoing risk, regardless of the relationship that existed during the project.
Not Testing the Role Before Handing It Over
Create a test user, assign the new client role to it, open a private browser window, and log in. Check that the login redirect works, that the correct menu items are visible, and that restricted areas return the expected result. Five minutes of testing prevents an awkward first login experience for your client.

Ignoring the Admin Colour Scheme Setting
This is a small one, but worth mentioning. Digages Role Manager lets you assign a custom admin colour scheme to each role. Giving client accounts a noticeably different colour scheme from your agency accounts provides a quick visual signal when you’re logged in as a client during testing, and it can subtly reinforce to clients that they’re working in a curated, role-specific environment.
Best Practices for Agency Client Access Management
- Document every role you create. Keep a note in your project management tool or handover document listing which role was created, what access it grants, and who it was assigned to. This is invaluable during support or revisit work.
- Use descriptive role names that include the client or function. “Content Client” or “Orders — RetailCo” is clearer than “Custom Role 2” when you’re looking at a list of roles on a multi-client WordPress installation.
- Always set a login redirect URL. It improves the client experience and reduces confusion from the moment they first log in.
- Enable audit logging on every client site. The Audit Log is your accountability layer and troubleshooting starting point. There’s no reason to leave it disabled.
- Include client access review in your maintenance retainer. A quarterly check — are the right roles active, are there any dormant accounts, have any roles drifted beyond their original scope — should be a standard part of any ongoing support agreement.
- Disable roles rather than deleting them when a project ends. If a client pauses their retainer and may return later, disabling the role preserves its configuration without giving the account any active access. Re-enabling takes one click.
- Brief your clients on their access level. A short paragraph in your handover documentation explaining “you have access to X, Y, and Z — if you need anything else, contact us” sets expectations and reduces support requests.
Conclusion
Giving clients limited WordPress access that actually fits their workflow is a fundamental part of delivering a well-built site. When a client logs in and sees only what they need, with a clean interface that takes them directly to their work, that experience reflects directly on your professionalism as an agency.
Digages Role Manager makes this achievable without any custom development. A content blog client role, a WooCommerce store owner role, or a reporting-only role can each be built and tested in under 15 minutes. Combined with audit logging and alert emails, you have a complete client access management system running quietly in the background.
The agencies that get this right spend less time fielding “I accidentally deleted something” calls, have fewer tense conversations about who made a change, and deliver handovers that clients actually find easy to use. None of that requires writing a single line of code.