🧾 New: Create Invoices. Request Direct Payments. FREE Download Now
How to Automatically Assign Pickup Locations in WooCommerce
If you run a WooCommerce store with more than one pickup point, whether that’s two branches, five fulfilment hubs, or twenty franchise locations, you already know the headache. A customer places an order, you squint at the address, cross-reference a map, then manually key in the nearest branch before notifying them. Multiply that by fifty orders a day, and it stops being a minor inconvenience and starts becoming a genuine operational drag.
There is a better way. Auto-Pickup Locations for WooCommerce solves this problem entirely by automating the location assignment the moment a customer checks out. No manual lookups. No mismatched branches. No frustrated customers who show up at the wrong store.

This guide walks you through exactly what the plugin does, why it matters, how to set it up from scratch, and how to get the most out of it, including a look at the Pro features that unlock the full power of the system.
What Is Auto-Pickup Locations for WooCommerce?
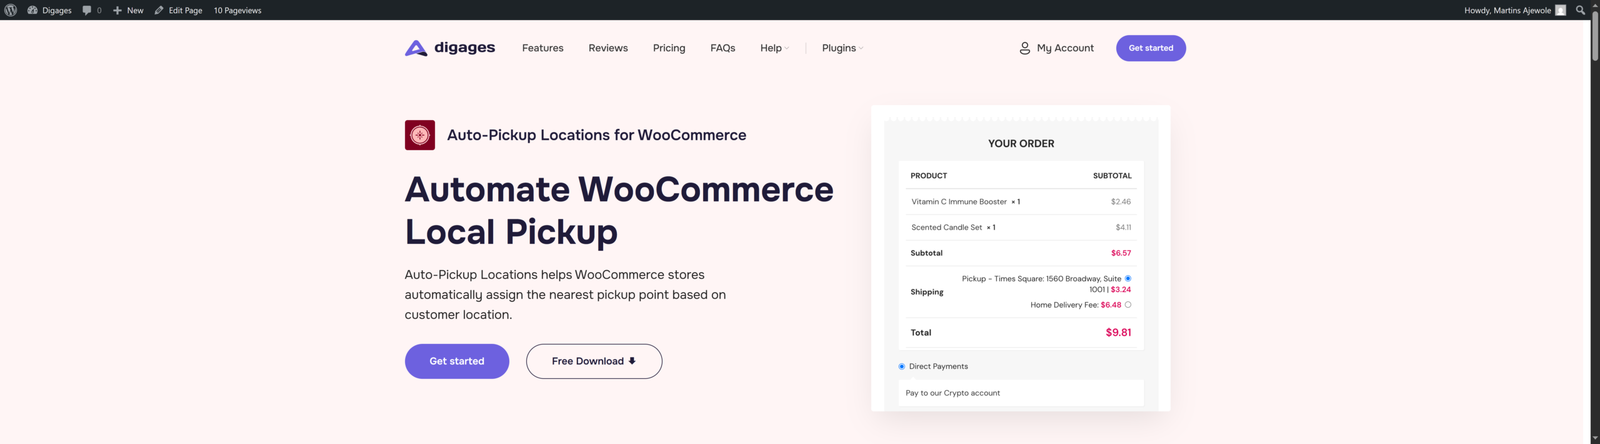
Auto-Pickup Locations (APL) is a WooCommerce shipping plugin. Its core job is to automatically assign the nearest pickup location to each customer at checkout, using their device or browser location, without requiring any external API keys or third-party mapping subscriptions.
It integrates natively with WooCommerce’s shipping system, appearing as a selectable shipping method just like any other. The difference is what happens under the hood: Auto Pickup Locations calculates distances between the customer’s position and each of your configured branch coordinates, then either assigns the closest one automatically or presents customers with an ordered list to choose from.
It is trusted by 5,000+ businesses across restaurants, retail chains, pharmacies, and fulfilment networks worldwide.
What Auto-Pickup Locations brings to your WooCommerce store
The plugin includes smart pickup selection that automatically assigns the nearest pickup point based on the customer’s location, without requiring any API keys. If you prefer to give customers more control, you can also allow them to browse and manually select their preferred branch during checkout.
It also improves communication by sending pickup details directly in customer and admin order emails, with the option to notify specific email addresses for each pickup location. For businesses managing multiple branches, the PRO version supports unlimited pickup locations, making it suitable for growing stores and multi-location operations.
To simplify location management, the PRO version also includes CSV import and export functionality, allowing you to bulk-upload pickup points from a spreadsheet or export existing data for backups and migrations. Each location can store rich details such as phone numbers, physical addresses, opening hours, and custom pickup instructions, helping customers get accurate information before collection.
The entire experience is fully mobile-ready and responsive, ensuring customers can browse and select pickup locations smoothly across desktop, tablet, and mobile devices.
How to Set Up Auto-Pickup Locations: Step-by-Step
Setup is intentionally straightforward. You do not need developer skills or access to any external APIs. Here is the full process from install to live checkout in three steps.
Step 1: Install and Activate the Plugin
- Go to WordPress Admin → Plugins → Add New.
- Search for Auto-Pickup Locations by Digages.
- Click Install Now, then Activate.
Once activated, navigate to WooCommerce → Settings → Shipping → APL Settings to access the configuration panel.

Step 2: Add Your Pickup Locations
Inside APL Settings, click Add New to create your first branch.
Fill in the following fields for each location:
- Location Name (e.g., “Ikeja Store” or “Downtown Hub”)
- Full Address
- Latitude and Longitude coordinates (15 decimal places for accuracy)
- Phone Number
- Email Address (for location-specific notifications)
- Pickup Cost (leave blank for free pickup)
- City, State, Country, Postal Code
- Custom Instructions (opening hours, access notes, etc.)
Get precise coordinates from Google Maps, right-click the exact pin location, then click the coordinate numbers to copy them. Always enter latitude first, longitude second.
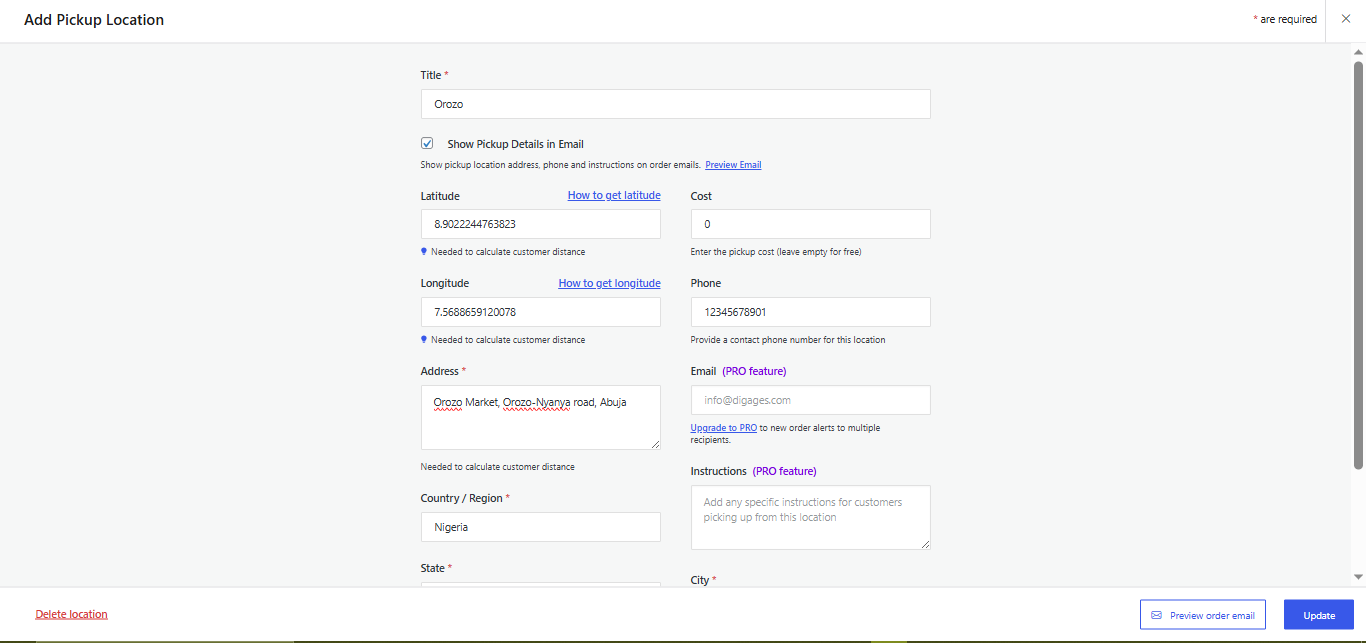
Coordinate Accuracy Matters: Use at least 15 decimal places when entering latitude and longitude. Small errors in coordinates are the single most common cause of incorrect auto-assignment. Copy directly from Google Maps.
Step 3: Enable APL and Configure Assignment Method
Toggle Enable Auto-Pickup Locations to ON.
Set the Title: this is what customers see at checkout (e.g., ‘Store Pickup’, ‘Pick Up at Nearest Branch’).
Choose your Method:
- Automatically Select Nearest Location: APL calculates the closest branch and assigns it. Best for chains with many locations where decision fatigue is a concern.
- Allow Customers to Choose: Customers see a dropdown list of all branches and select their preferred one. Best for stores where customers may regularly shop at a specific location.
Save your changes and run a test checkout to confirm pickup locations appear correctly.
If you suspect a plugin conflict, temporarily deactivate all plugins except WooCommerce and Auto-Pickup Locations. If pickup works in that environment, reactivate plugins one by one to identify the culprit.
Conclusion
If you have been managing pickup locations manually or accepting the limitations of WooCommerce’s built-in option, now is the time to automate it properly. Your customers get a smoother checkout. Your team gets back the time they were wasting on manual matching. And your operations scale cleanly as you add new locations.
Install it, add your branches, toggle the switch, and let your store handle the rest.
Auto-Pickup Locations for WooCommerce is available right now — free on WordPress.org. You can get a Pro upgrade directly from here.
