Understanding Digages Website Monitor Settings

Last modified: June 18, 2026

Introduction

The Settings page is the control centre of Digages Website Monitor. It allows site administrators to customise exactly which security modules are active, how strictly login attempts are policed, how long log data is retained, and who receives email alerts when admin changes occur.

You access the settings page by going to your WordPress Admin Dashboard → Website Monitor → Settings. The settings page is organised into six sections: Module Settings, Login Security, Data Management, Access Control, Email Notifications, and Export Settings.

This article walks through each section, explaining what every option does and how to configure it for your site.

Module Settings

Module Settings control which monitoring features are active. Each module can be independently enabled or disabled with a simple checkbox, allowing you to run only the monitoring you need.

  • User Activity Tracking: When enabled, it records every page visit by logged-in users and guests, including the URL, IP, device, and timestamp. This is the foundation of the Activity Logs module.
  • Page Behaviour Tracking: Tracks how long visitors spend on each page and their navigation patterns. Useful for understanding user journeys, but can increase database usage on high-traffic sites.
  • Login Attempts Monitoring: Logs every login attempt — successful or failed — with username, IP address, browser details, and outcome. Feeds the Login Attempts dashboard and drives the IP lockout mechanism.
  • Admin Change Alerts: Records every change made at the admin level, including plugin activations, theme changes, and settings updates. Critical for maintaining an audit trail on multi-admin sites.

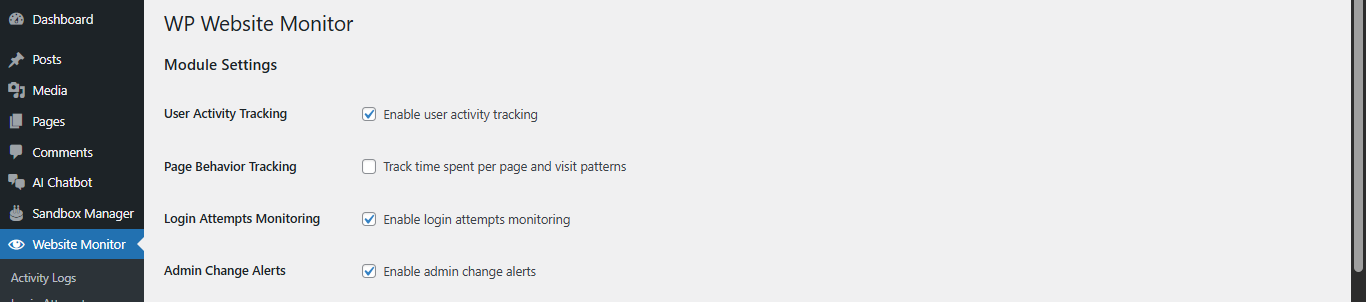
Recommendation: For most sites, you can track User Activity, Login Attempts, and Admin Change at all times. Track Page Behaviour only if you specifically need visitor behaviour analytics.

Login Security

The Login Security section governs how the plugin responds to repeated failed login attempts. These settings work together with the Login Attempts Monitoring module to enforce automatic IP-based lockouts — one of the most effective defences against brute-force password attacks.

Max Login Attempts

This setting defines how many consecutive failed login attempts are permitted from a single IP address before that IP is automatically locked out.

Once an IP reaches this threshold, all further login attempts from that address are blocked until the lockout duration expires.

Note: For sites under active attack, a lower value, such as 3, would provide stronger protection. For sites with users who frequently forget passwords, a slightly higher value, such as 7 or 8, may reduce false lockouts.

Lockout Duration

This setting controls how long (in minutes) a locked-out IP address is prevented from attempting to log in again after reaching the maximum failed login threshold.

After the lockout duration expires, the IP address is automatically cleared, and the user may attempt to log in again. The failed attempt counter resets.

Tip: A 30-minute lockout is sufficient to defeat most automated bots. For high-security environments, consider increasing this to 60 or 120 minutes

Data Management

The Data Management section controls how the plugin stores and handles the log data it collects. As logs accumulate over time, it is important to manage database growth to maintain site performance.

Data Retention (Days)

This setting specifies how many days of log data the plugin retains before automatically deleting older records. You can enter 0 to keep logs permanently (no automatic deletion).

Log entries older than the specified number of days are automatically removed from the database. This prevents unbounded growth of the log tables.

Tip; For sites with compliance requirements (e.g., GDPR, PCI-DSS), consider exporting logs regularly via CSV before the retention period expires, or set the value to 0 and manage deletion manually.

IP Anonymization

When enabled, this option partially masks IP addresses stored in the logs, replacing the final octet with zeros (e.g., 102.91.105.169 becomes 102.91.105.0). This helps bring the plugin into alignment with privacy regulations that restrict the storage of personally identifiable information.

Enabling IP Anonymization improves privacy compliance but reduces the usefulness of IP-based investigations, since two users on the same subnet will appear identical in logs.

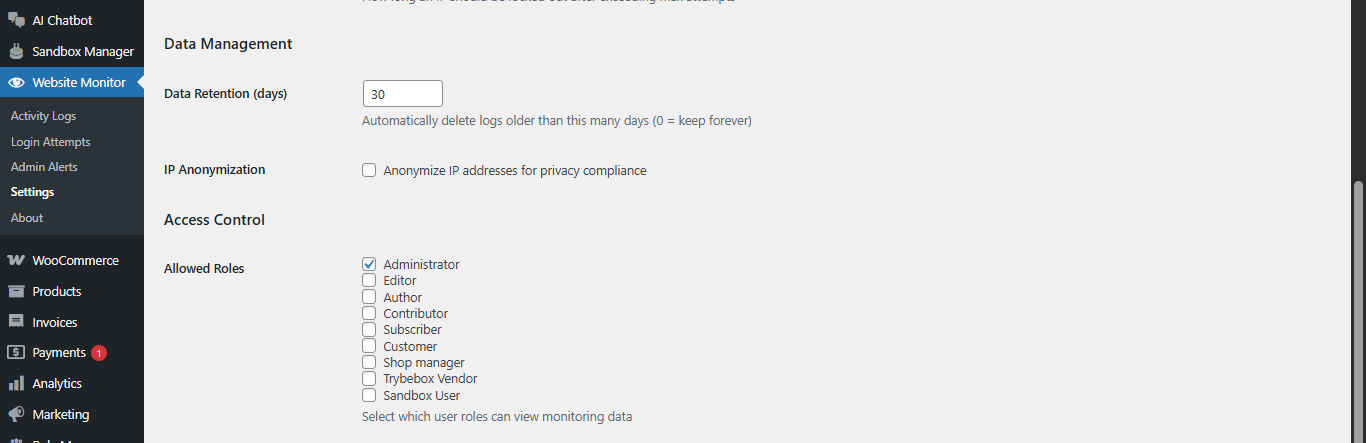
Note: Sites serving users in the European Union or other privacy-regulated regions should evaluate if storing full IP addresses requires a legal basis under their data protection laws. IP Anonymization is one way to mitigate this risk.

Access Controls

The Access Control section determines which WordPress user roles are permitted to view the monitoring data within the Website Monitor dashboard. This is an important security layer in its own right: the monitoring data itself is sensitive and should only be visible to appropriate staff.

Allowed Roles

The Allowed Roles setting presents a checklist of all user roles defined on the site. Check each role that should have access to the Activity Logs, Login Attempts, and Admin Alerts pages.

Available roles are;

Administrator: Full access. Should always be checked. Default: Enabled.

Editor: Content managers who may need activity visibility but not full security oversight.

Author: Usually does not require access to monitoring data.

Contributor: Typically, no access needed.

Subscriber: Standard site members. Access is not recommended.

Customer: WooCommerce customers. Access is not recommended.

Shop Manager: WooCommerce store managers who may need login or activity visibility.

Trybebox Vendor: A Specific marketplace vendor. Grant access only if operationally required.

Best practice: Restrict access to the Administrator role only unless there is a clear operational reason to share monitoring visibility with other roles.

Email Notifications

The Email Notifications section enables the plugin to send automatic email alerts when admin-level changes are detected. This ensures that even when you are not actively logged into the WordPress dashboard, you are informed of significant events in real time.

Enable Notifications

This checkbox activates or deactivates the email alerting system. When enabled, the plugin will send an email to the configured notification address whenever a change is recorded in the Admin Alerts module.

Default Value: Site admin Email

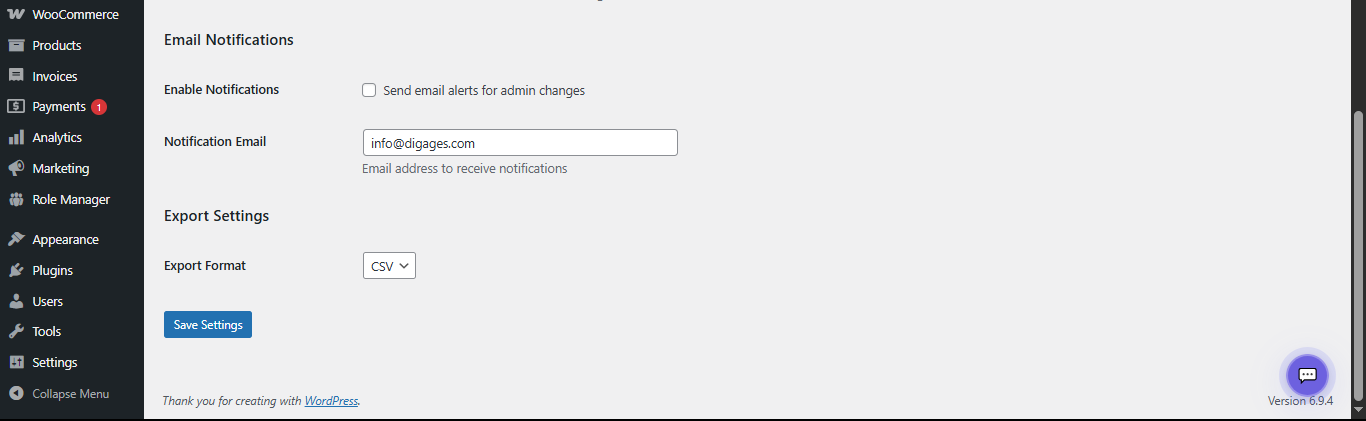
Tip:  Use a dedicated security inbox rather than a personal inbox to ensure alerts are seen promptly and not lost among other emails. Also, enable notifications and direct them to this monitoring inbox.

Export

The Export Settings section controls the file format used when exporting log data from any of the three monitoring pages (Activity Logs, Login Attempts, Admin Alerts).

Export Format

Currently, the plugin supports CSV (Comma-Separated Values) as the export format. CSV files are universally compatible and can be opened directly in Microsoft Excel, Google Sheets, LibreOffice Calc, and most data analysis tools.

Tip: Export log data for external analysis, compliance audits, incident reports, or archival before the data retention period expires.

Saving Your Settings

All changes made on the Settings page take effect only after clicking the ‘Save Settings’ button at the bottom of the page. It is important to save after every change — navigating away from the page without saving will discard any unsaved modifications.

Reminder: Always click ‘Save Settings’ after making any changes. A success message will appear at the top of the page to confirm the settings were saved.

Conclusion

The Settings page in Digages Website Monitor gives you full operational control over how your site is monitored, secured, and maintained. By properly configuring each section—Module Settings, Login Security, Data Management, Access Control, Email Notifications, and Export Settings—you can tailor the plugin to match your site’s specific security requirements and administrative workflow.

For best results, review these settings during initial setup and revisit them periodically as your site grows or your security needs change. Small adjustments, such as tightening login restrictions, refining notification triggers, or managing data retention policies, can significantly improve both security visibility and system performance.

A well-configured Settings page ensures that Website Monitor not only tracks activity but actively supports proactive site management, helping you stay informed, reduce risks, and maintain full control over your WordPress environment.

Was this article helpful?
No