🎁 New: Build Customer Loyalty & Drive Repeat Purchases with WooCommerce. Learn more


In this article
- 1. Step 1: Install and Activate Direct Invoices
- 2. Step 2: Add Account as a Payment Option
- 3. Step 3: Create and Send the Invoice
- 4. Step 1: Install and Activate Direct Payments WP
- 5. Step 2: Add Account as a Payment Method
- 6. Step 3: Create and Publish a Payment Form
- 7. Step 1: Install and Activate Direct Payments for WooCommerce
- 8. Step 2: Add Your Account Details
- 9. Step 3: Enable Account at Checkout
PocketApp is a Nigerian money app for everyday spending. It lets you send and request money, pay bills, split costs in groups, manage your salary, and move money into Piggyvest, all in one place. The Central Bank of Nigeria (CBN) licensed it as a Mobile Money Operator, and the NDIC insures deposits.
If your customers already pay people on PocketApp, you can let them pay you the same way on your WordPress website. They send money straight to your PocketApp account, and there is no payment gateway, no API keys, and no card details involved. Because it works like a peer-to-peer payment, it is simple for customers and simple for you to set up.
This guide will teach you how to accept PocketApp Payments on WordPress.
Accepting Payments With Digages Solutions
In this guide, you will learn 3 ways to receive payments on WordPress, each using a different Digages plugin:
- Method 1: Send invoices with Direct Invoices
- Method 2: Collect payments through forms with Direct Payments WP
- Method 3: Accept payments at checkout with Direct Payments for WooCommerce
In all three plugins, you add the payment details under the Peer-to-Peer (P2P) payment method category.
Unlike a bank account, a P2P method does not use a bank name and account number. Instead, you tell the plugin which platform you use (PocketApp), the name on your account, and the ID customers should send money to, such as your PocketApp tag.
Before you start, open your PocketApp and note the details customers will use to find you. Keep them ready to use.
💡 Tip: Copy your tag or ID straight from your PocketApp so there are no typing errors. Customers who send money to the wrong person may not get it back.
Method 1: Using Invoices (Direct Invoices)
Use this method when you bill clients for services, projects, or one-off orders and want to send them a professional invoice.
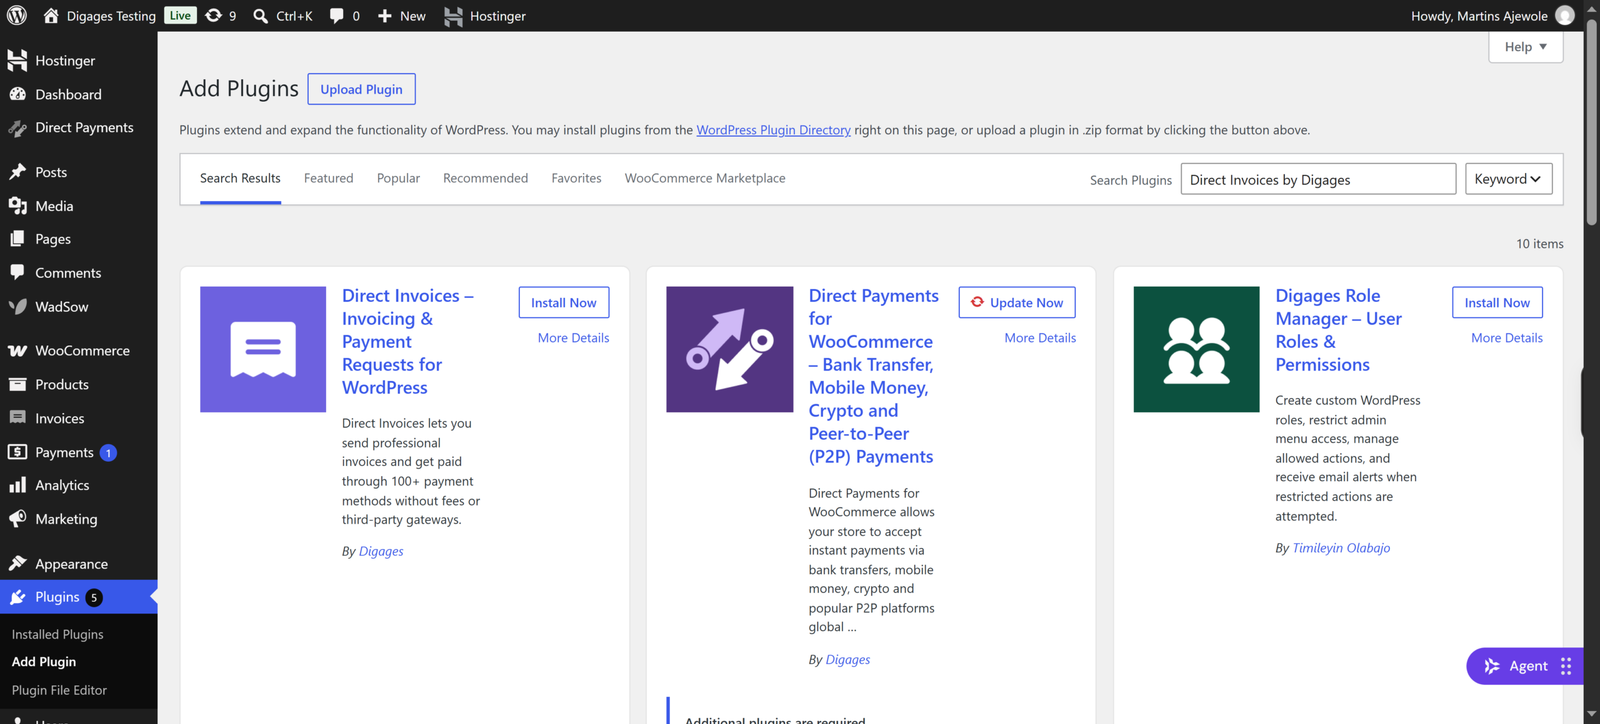
Step 1: Install and Activate Direct Invoices
- Download the Direct Invoices ZIP file from the Direct Invoices page.
- In your WordPress dashboard, go to Plugins > Add New.
- Click Upload Plugin, choose the ZIP file, and click Install Now.
- Click Activate.
A new Invoice menu now appears in your sidebar.
Step 2: Add Account as a Payment Option
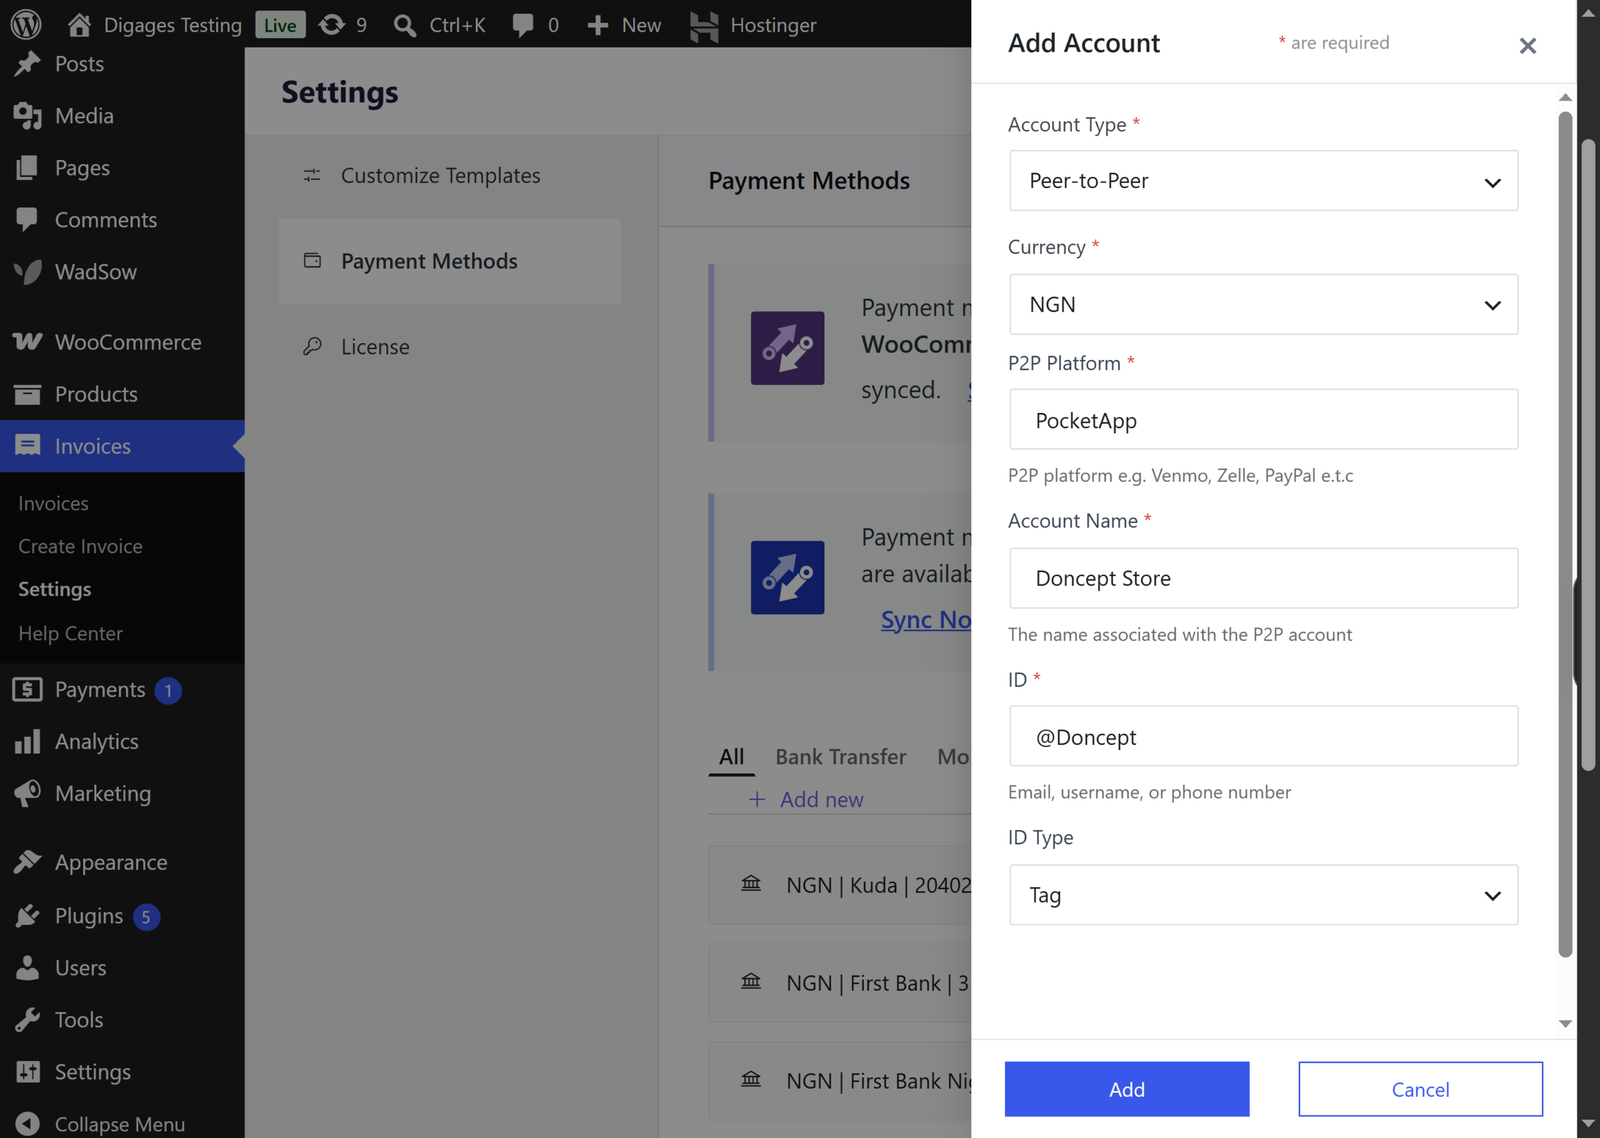
- Go to Invoice > Settings > Payment Methods.
- Click Add Account.
- Select Peer-to-Peer (P2P).
- Fill in the details:
- Currency: Choose NGN (Nigerian naira).
- P2P Platform: Enter PocketApp.
- Account Name: Enter the name on your PocketApp account.
- ID: Enter your PocketApp tag or the ID customers use to send you money.
- ID Type: Select the type of ID you entered, such as Tag or Username.
- Click Save Account.
With the free version, you can add 1 bank account. Direct Invoices Pro lets you add Unlimited Payment Methods. Upgrade Today.
💡 Tip: Already use Direct Payments for WooCommerce or Direct Payments WP? Use the Sync option on the Payment Methods tab to import your existing payment methods instead of adding them again.
Step 3: Create and Send the Invoice
- Go to Invoice > Create Invoice.
- Under Invoice Details, enter the Invoice Title, click Add Customer to add your customer’s details, then select the Currency, Invoice Date, and Due Date.
- Under Invoice Items, add what you are billing for: a custom service or a WooCommerce product, with the quantity and rate.
- Under Invoice Options, add tax or a discount if needed, and add a note for your customer.
- Still in Invoice Options, under Select Payment Account, choose the account you just added.
- Go to Invoice Summary (top-left area).
- Click Save Invoice. This creates the invoice and lets you send it.
- Choose how to send it: Email, WhatsApp, or Telegram. WhatsApp and Telegram messages include a link where your customer can view the invoice.
- You can also download the invoice as a PDF.
⚠️ Important: Do not skip Select Payment Account. If you leave it out, the invoice will not carry any payment details, and your customer will not know where to send the money.
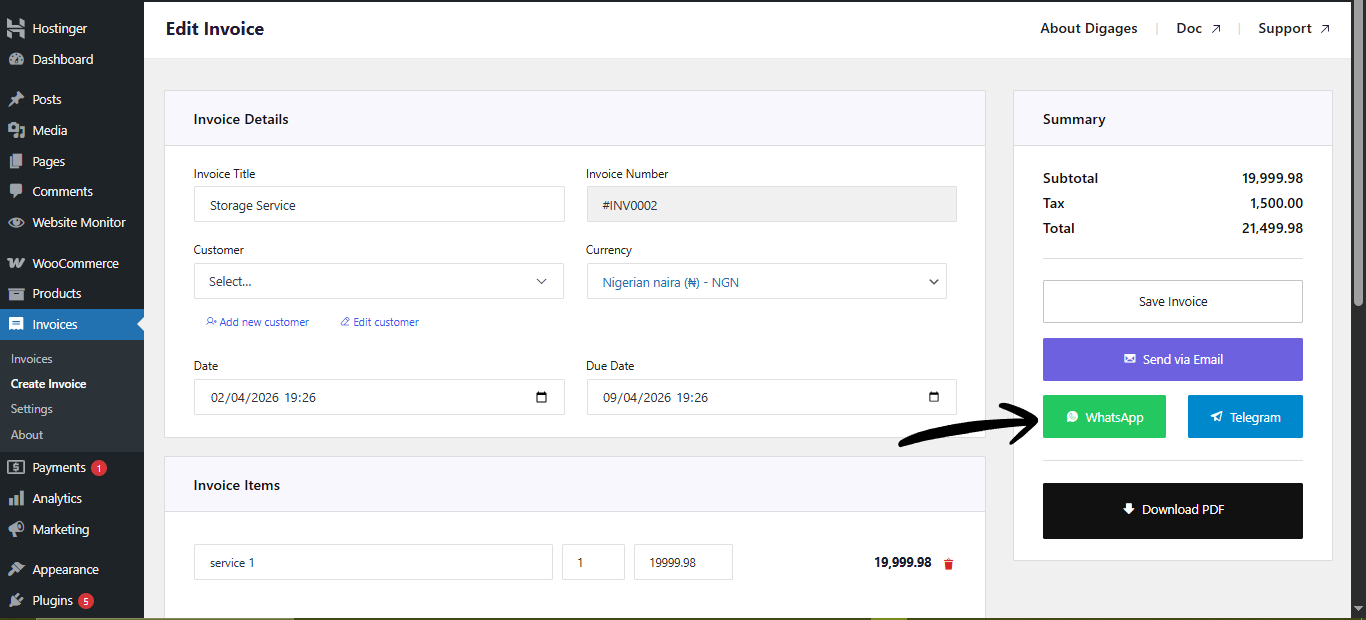
💡 Tip: Sending the invoice through WhatsApp or Telegram often gets a faster response than email alone.
Method 2: Using Forms (Direct Payments WP)
Use this method when you want a payment form on your website, such as a service payment, a booking deposit, a registration fee, or a donation.
Step 1: Install and Activate Direct Payments WP
- Log in to your WordPress admin panel.
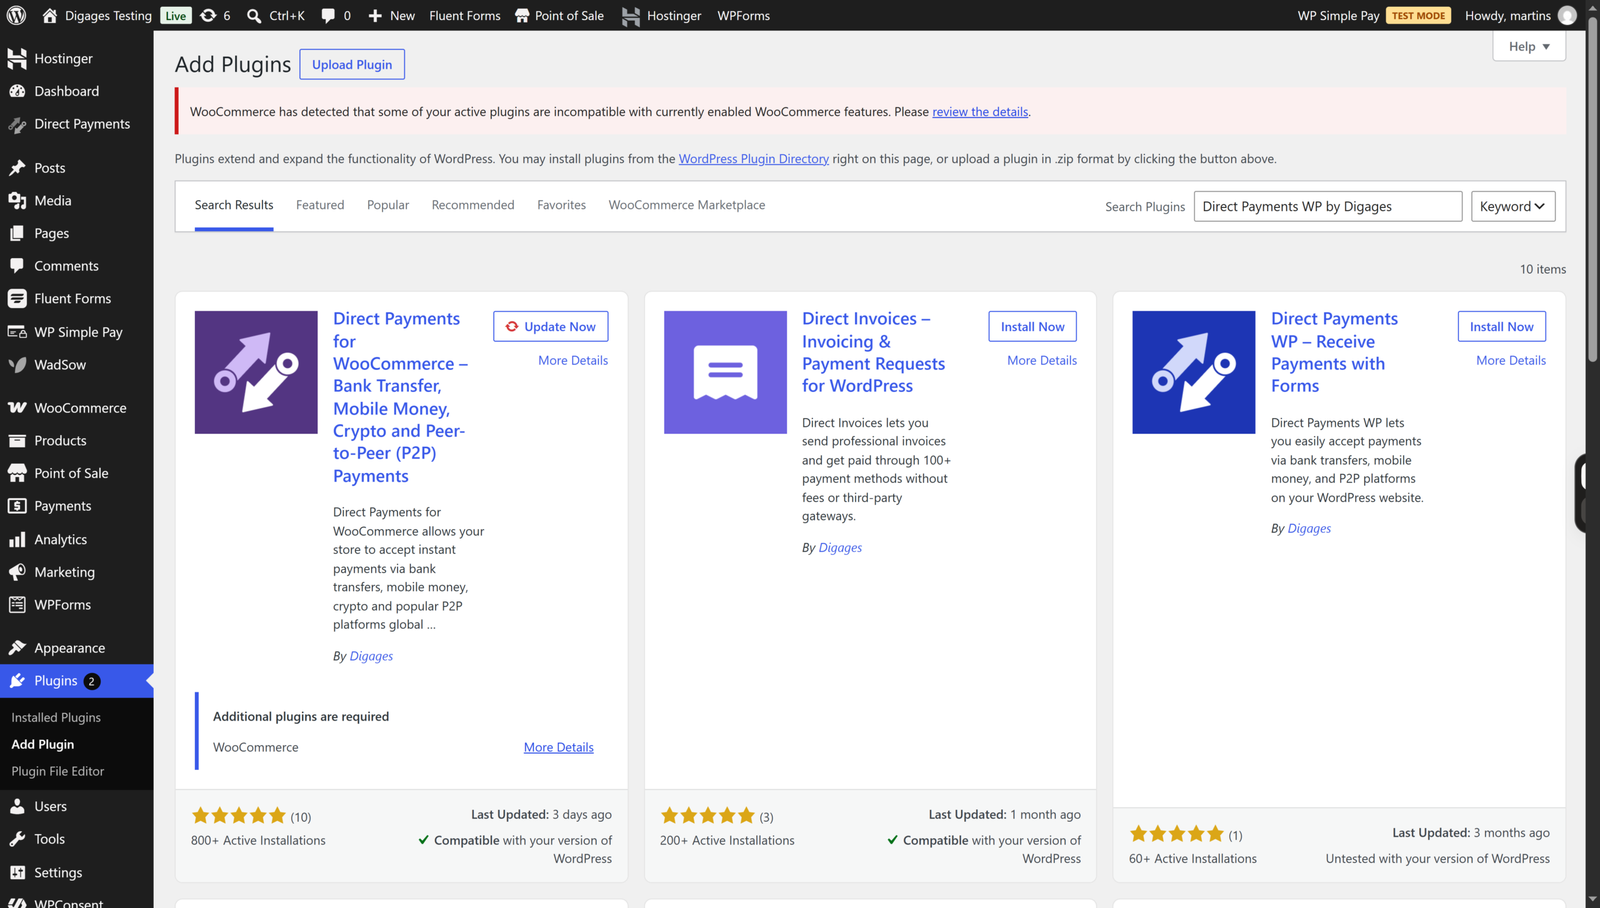
- Go to Plugins > Add New and search for Direct Payments WP by Digages.
- Click Install, then Activate.
For more details, see our setup guide for Direct Payments WP.
Step 2: Add Account as a Payment Method
- Go to Direct Payments > Settings and open the Payment Methods tab.
- Click + Add New and select the Peer-to-Peer (P2P) category.
- Fill in the details:
- Currency: Choose NGN (Nigerian naira).
- P2P Platform: Enter PocketApp.
- Account Name: Enter the name on your PocketApp account.
- ID: Enter your PocketApp tag or the ID customers use to send you money.
- ID Type: Select the type of ID you entered, such as Tag or Username.
- Click Save Changes.
With the free version, you can add 1 bank account. Direct Payments WP Pro lets you add Unlimited Payment Methods. Upgrade Today.

Step 3: Create and Publish a Payment Form
On your WordPress dashboard
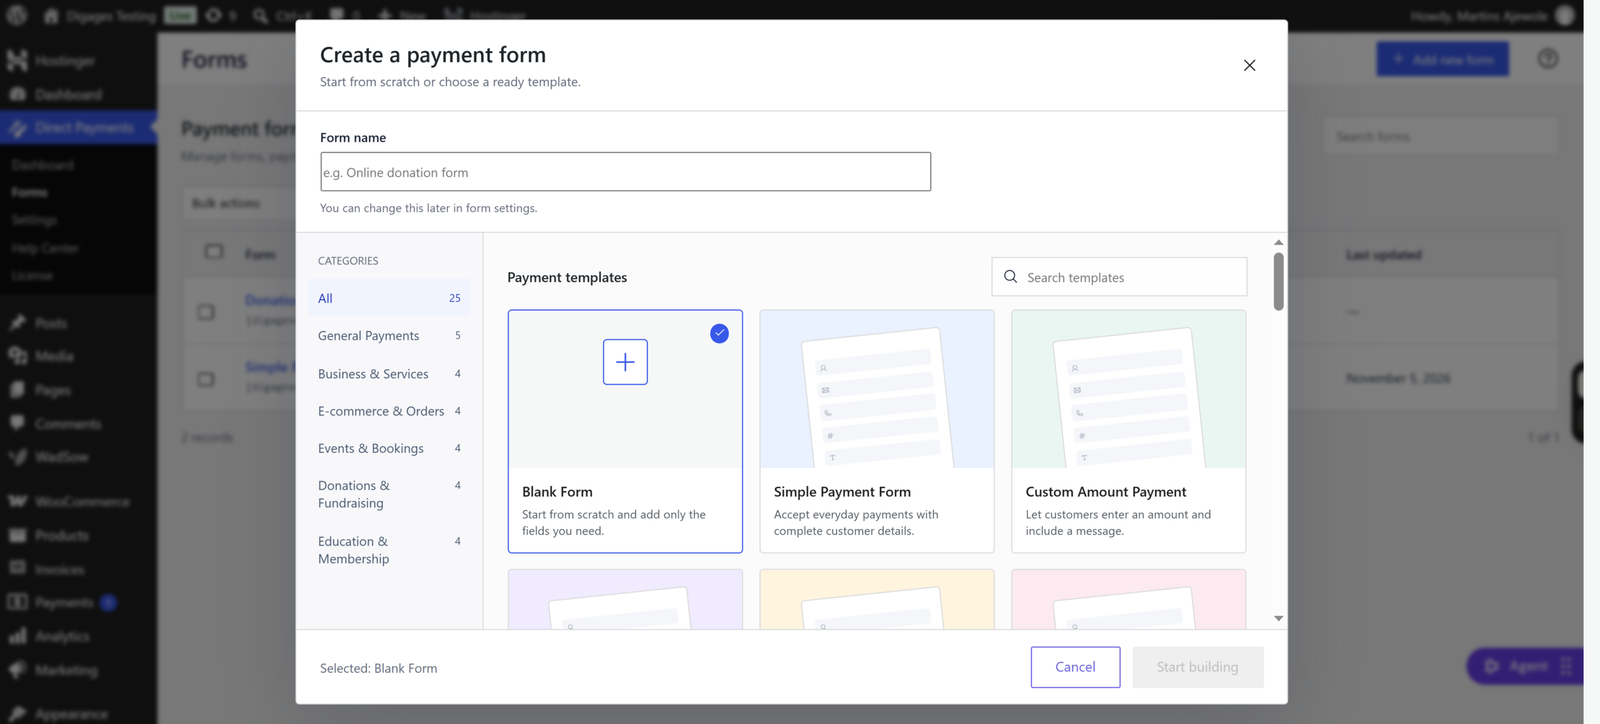
- Go to Direct Payments > Forms.
- Click Add New.
- You will see two options to create your form:
- Use a Template: Choose from the ready-made payment form templates already provided. You can open a template and make a few small edits to fit your needs.
- Create a Blank Form: Start from scratch and build the form yourself.
- If you choose a blank form, build your form by adding all the input fields you need. For example: Name, Email, Phone Number, Amount, and any other details you want to collect from the customer.
- After you have finished creating your form, click Save to save the form.
- Next, click Publish.
- A window will pop up with two options:
- Copy Form Shortcode: Copy the shortcode and paste it yourself on any page or post where you want the form to appear.
- Automatically Create a New Page: This automatically creates a new page and puts the form shortcode inside it, so the form is live on that new page immediately.
Your payment form is now published and ready to receive payments.
For more details, read How to Create a Payment Form in WordPress.
💡 Tip: Visit the page yourself and test the form before you share it with customers.
Method 3: Checkout on Your WooCommerce Store (Direct Payments for WooCommerce)
Use this method when you run an online store and want your account to appear as a payment option at checkout.
Step 1: Install and Activate Direct Payments for WooCommerce
- Log in to your WordPress admin panel.
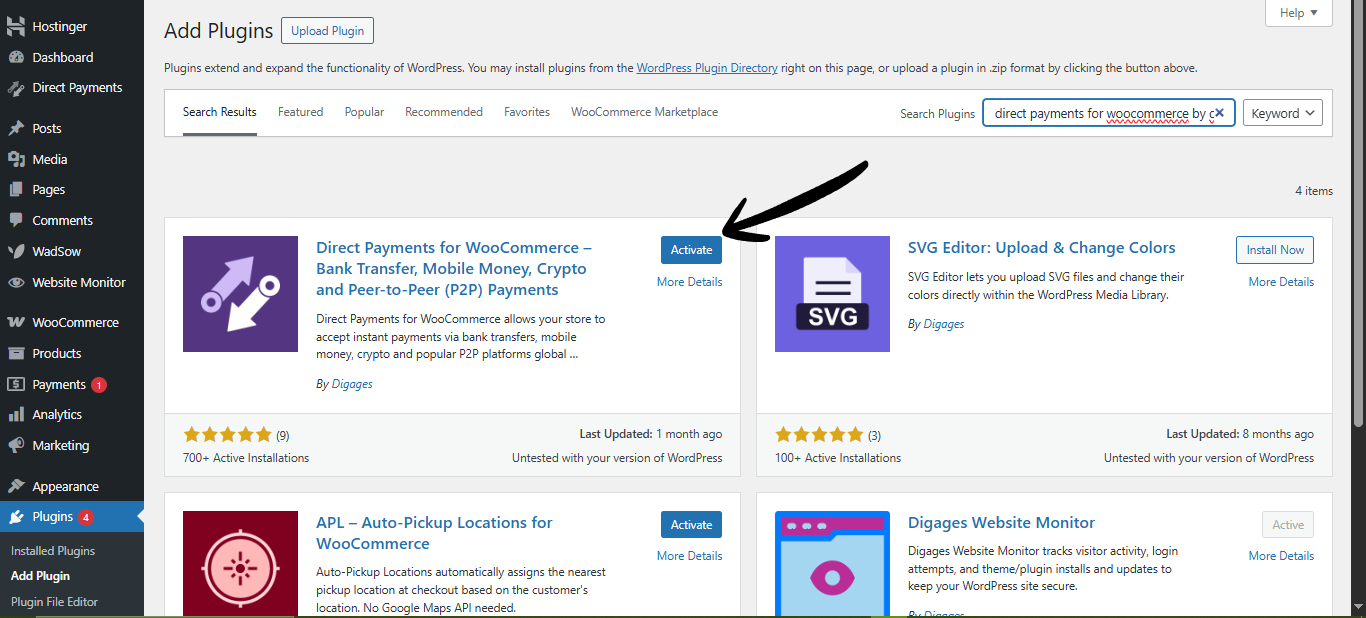
- Go to Plugins > Add New and search for Direct Payments for WooCommerce by Digages.
- Click Install, then Activate.
Need more help? See the installation guide.
Step 2: Add Your Account Details
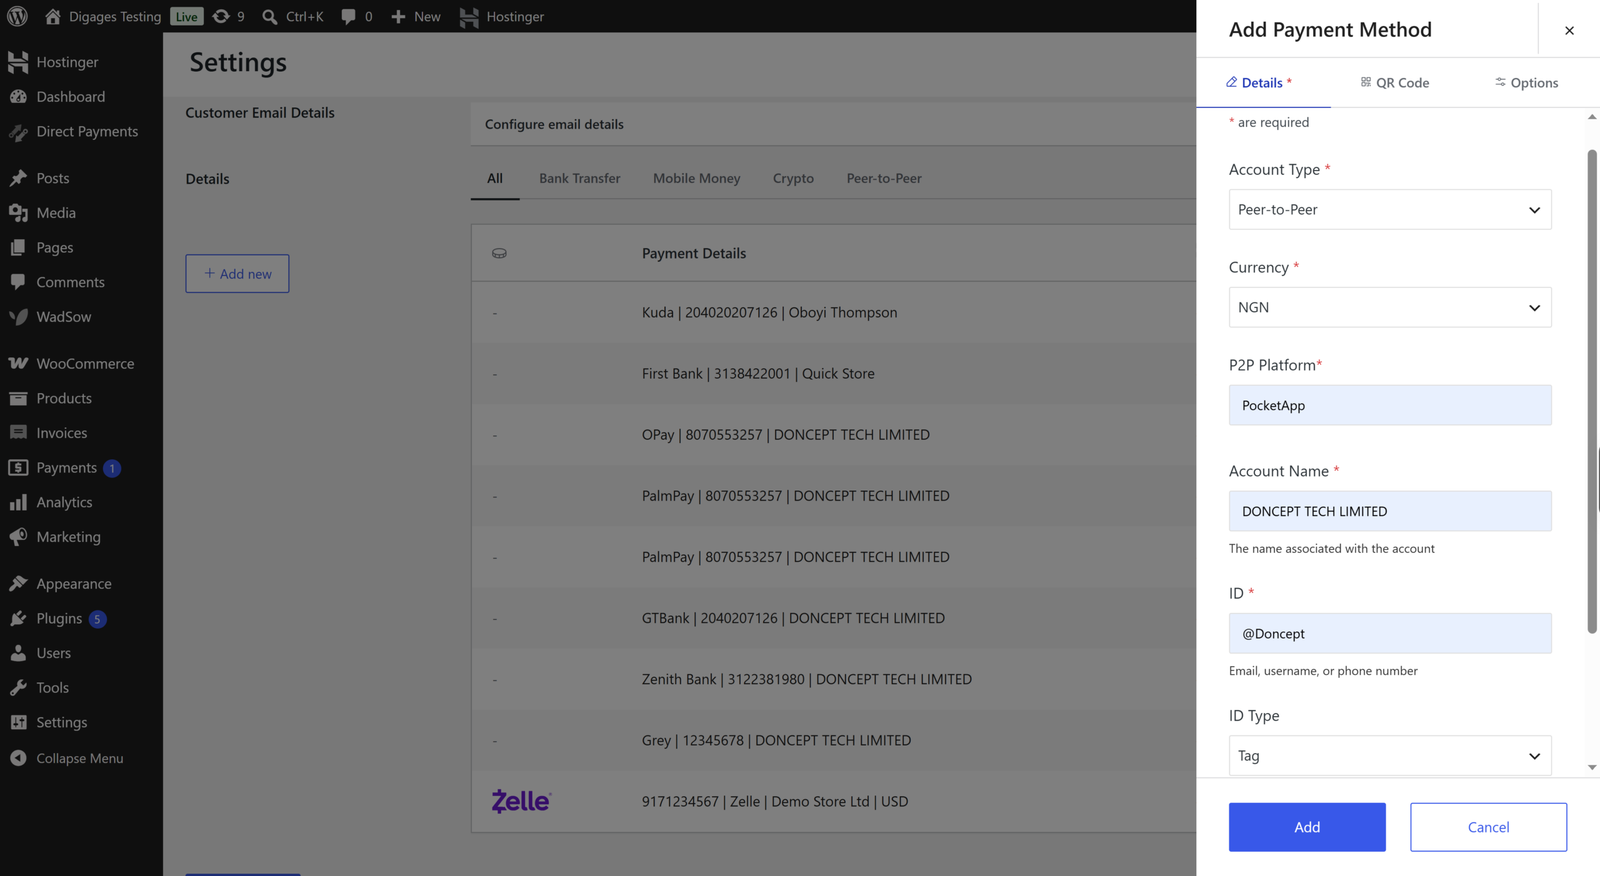
- Go to WooCommerce > Direct Payments > Settings and open the Payment Methods tab.
- Click + Add New and select the Peer-toPeer category.
- Fill in the details:
- Currency: Choose NGN (Nigerian naira).
- P2P Platform: Enter PocketApp.
- Account Name: Enter the name on your PocketApp account.
- ID: Enter your PocketApp tag or the ID customers use to send you money.
- ID Type: Select the type of ID you entered, such as Tag or Username.
- Click Save Changes.
With the free version, you can add 1 bank account. Direct Payments for WooCommerce PRO lets you add as many as you need.
Step 3: Enable Account at Checkout
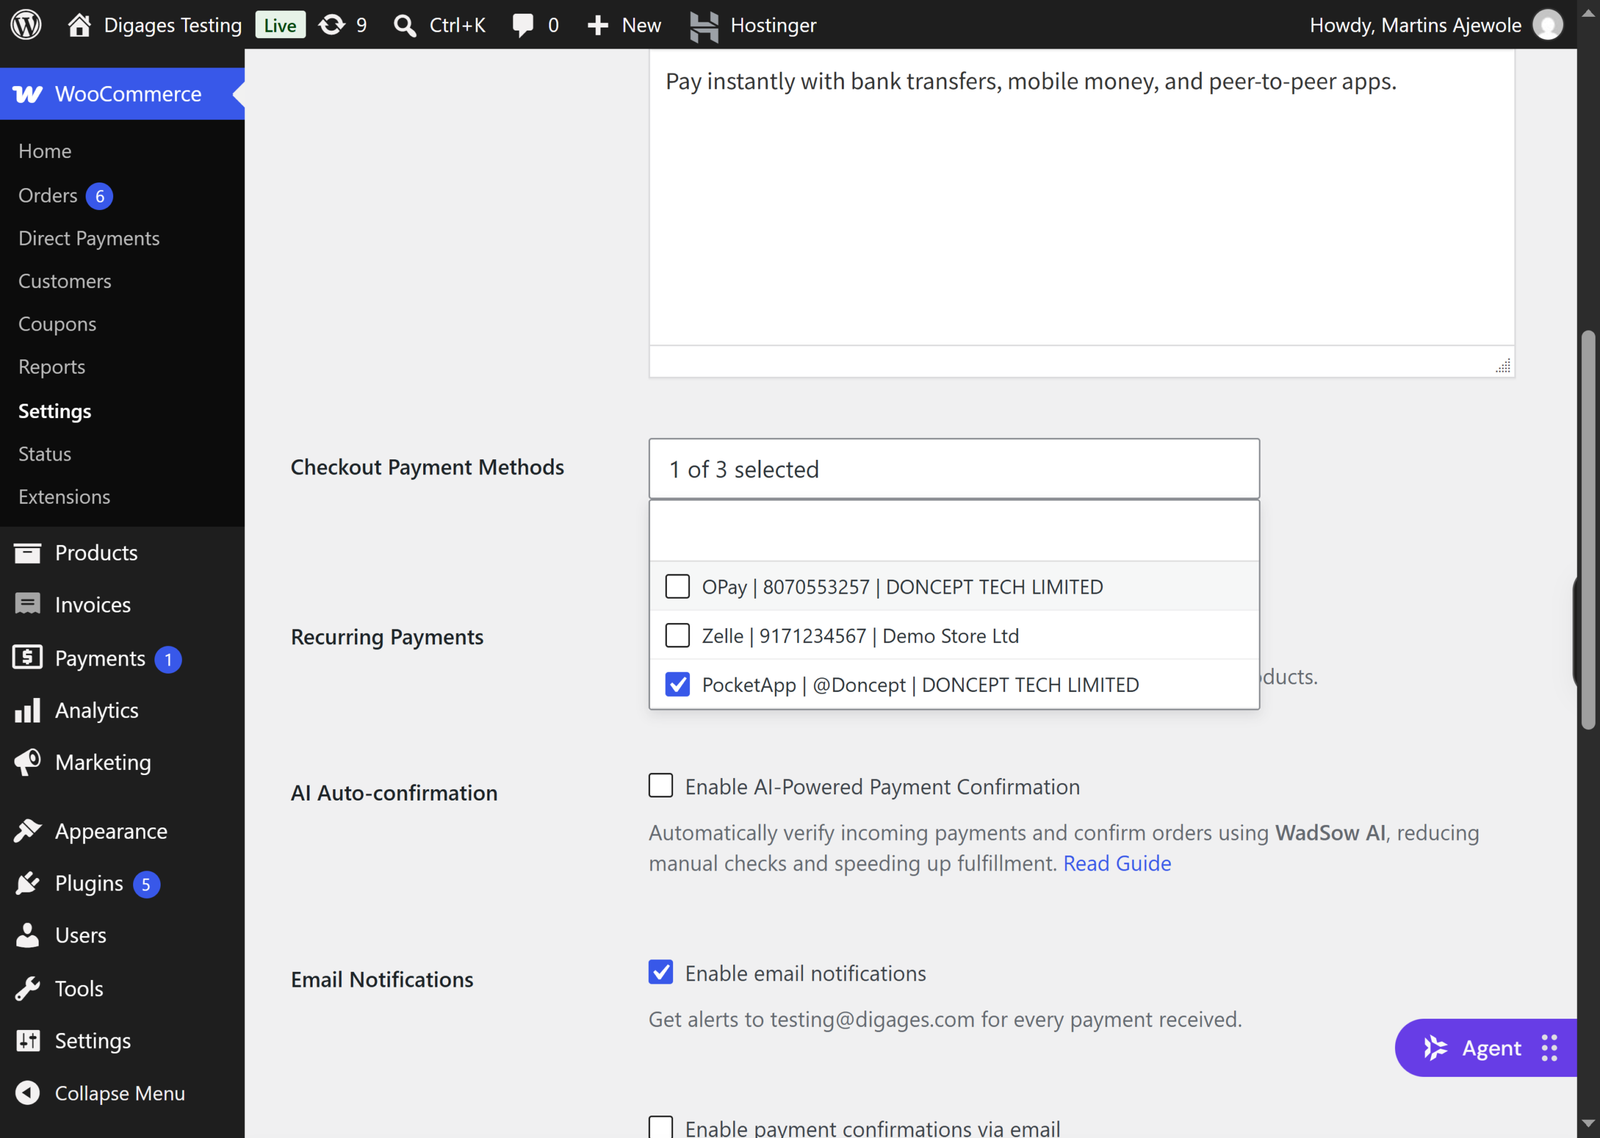
- Go to WooCommerce > Direct Payments > Settings > Checkout Payment Methods.
- Make sure the account you just added is selected.
Customers can now choose it as a payment option at checkout.
Conclusion
You can receive PocketAPP payments on WordPress in three ways. Pick the one that matches how you do business:
- Choose Direct Invoices if you bill clients for services or projects. You create an invoice, attach your PocketApp account, and send it by email, WhatsApp, or Telegram.
- Choose Direct Payments WP if you want a payment form on a page or post. You embed it with a shortcode, and visitors pay without needing an invoice.
- Choose Direct Payments for WooCommerce if you run an online store. PocketApp appears at checkout, and you confirm payments against your WooCommerce orders.
All three plugins can be used on the same website, so you can start with one and add the others as your business grows.
That’s it! You’re now ready to receive PocketApp payments on your WordPress website.
If you still need help, visit our documentation or contact support.


