✨ New: Sell Gifts & Personalized WooCommerce Products with Engraver. Learn more


In this article
- 1. Introduction
- 2. Watch This Full Setup Guide
- 3. Subscriber
- 4. Contributor
- 5. Author
- 6. Editor
- 7. Administrator
- 8. Basic Information
- 9. WordPress Core Capabilities
- 10. WooCommerce Capabilities
- 11. WooCommerce Capabilities
- 12. Admin Menu Access
- 13. Managing Your Custom Roles
- 14. Edit an Existing User
- 15. Creating a New User
Introduction
WooCommerce ships with its own Shop Manager role, which already covers most day-to-day store operations, orders, products, coupons, customers, and reports, without granting plugin, theme, or user-management access. For many stores, that’s a reasonable starting point. But Shop Manager also bundles in full access to every WooCommerce settings screen: payment gateways, tax rules, shipping zones, and integrations, areas that a senior operations staff member rarely needs to touch, and that carry real risk if changed by accident.
The fix isn’t to avoid Shop Manager’s capabilities; they’re exactly what a Store Manager needs for orders, products, coupons, and reporting. The fix is to inherit from Shop Manager to keep that operational foundation, then use admin menu controls to hide the Settings screens specifically, since WooCommerce’s capability system alone can’t separate “run the store” from “reconfigure the store.”
This guide walks you through creating that role using Digages Role Manager step by step, including every capability and menu access setting you need to configure.
In This Article
- Introduction
- Understanding WordPress User Roles
- Installing Digages Role Manager
- Creating the Store Manager Role
- Saving Your Role
- Connecting Role To A User
- Conclusion
Watch This Full Setup Guide
Understanding WordPress User Roles
WordPress includes five default user roles, each designed with a different level of access and responsibility. Understanding these roles helps explain why creating a custom role is often the best option when assigning permissions to a marketing team member.
Subscriber
Subscribers have the most limited level of access. They can read content on the website and manage their own user profile, but they cannot create, edit, or publish content, nor can they access administrative settings.
Contributor
Contributors can create and edit their own posts, then submit them for review. However, they cannot publish posts themselves or upload media files, making this role suitable for writers who require editorial approval.
Author
Authors have more publishing privileges. They can create, edit, publish, and manage their own posts, as well as upload media files. Their permissions are limited to their own content, so they cannot modify posts created by other users.
Editor
Editors are responsible for managing the site’s content. They can create, edit, publish, and delete any posts or pages, manage categories, moderate comments, and oversee the media library. However, they do not have access to site administration settings or WooCommerce configuration.
Administrator
Administrators have unrestricted access to the entire WordPress site. They can manage users, install plugins and themes, change site settings, configure WooCommerce, and perform all administrative tasks. Because this role provides complete control over the website, it is generally far more access than a marketing team member needs.
Shop Manager is the closest fit for a Store Manager role by a wide margin; it’s already scoped away from plugins, themes, and user accounts. The remaining gap is settings access. WooCommerce gates most of its operational screens (orders, products, coupons, reports) and its settings screens (payments, tax, shipping) behind the same underlying capability. That means you can’t separate the two purely through capabilities; you also need to control which admin menu items are visible. This is exactly what Digages Role Manager’s Admin Menu Access section is built for.
Installing Digages Role Manager
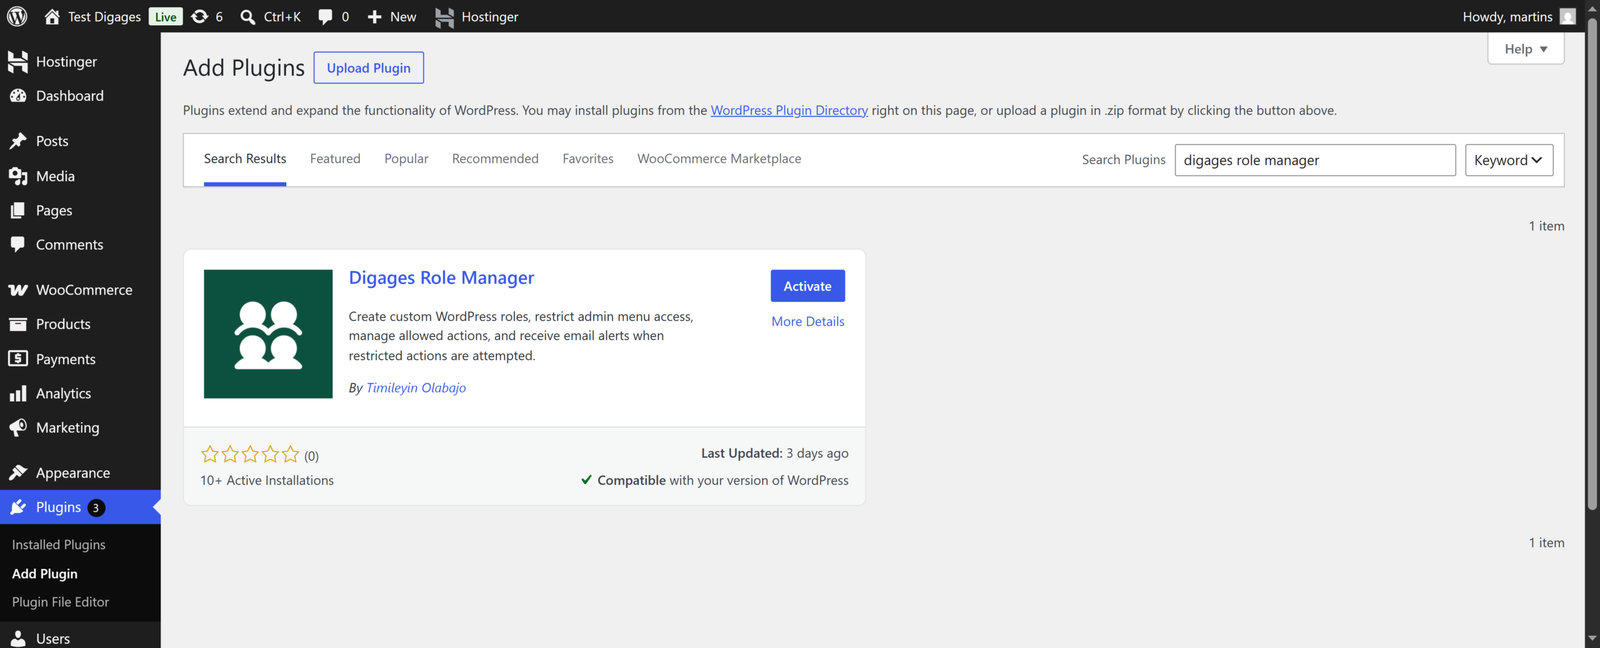
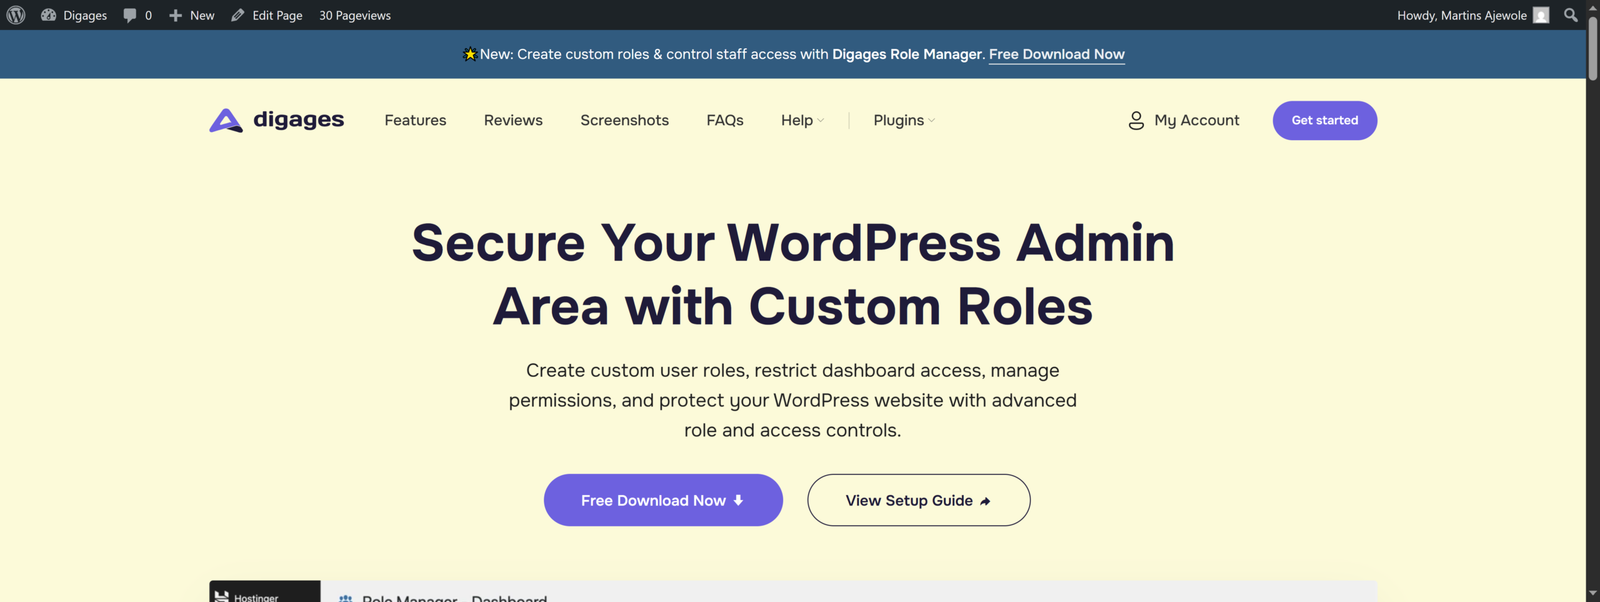
Digages Role Manager is available for free from WordPress.org and also directly from the Digages website. Choose whichever method suits you.
Method A — Installing from WordPress
- In your WordPress dashboard, go to Plugins → Add New.
- Search for Digages Role Manager.
- Click Install Now, then Activate.
Method B — Installing from Digages
Download the plugin ZIP file from the Digages Website, then follow these steps:
- Go to your WordPress dashboard and navigate to Plugins → Add New.
- Click Upload Plugin at the top of the page.
- Click Choose File and select the ZIP file you downloaded.
- Click Install Now.
- Once installed, click Activate Plugin.
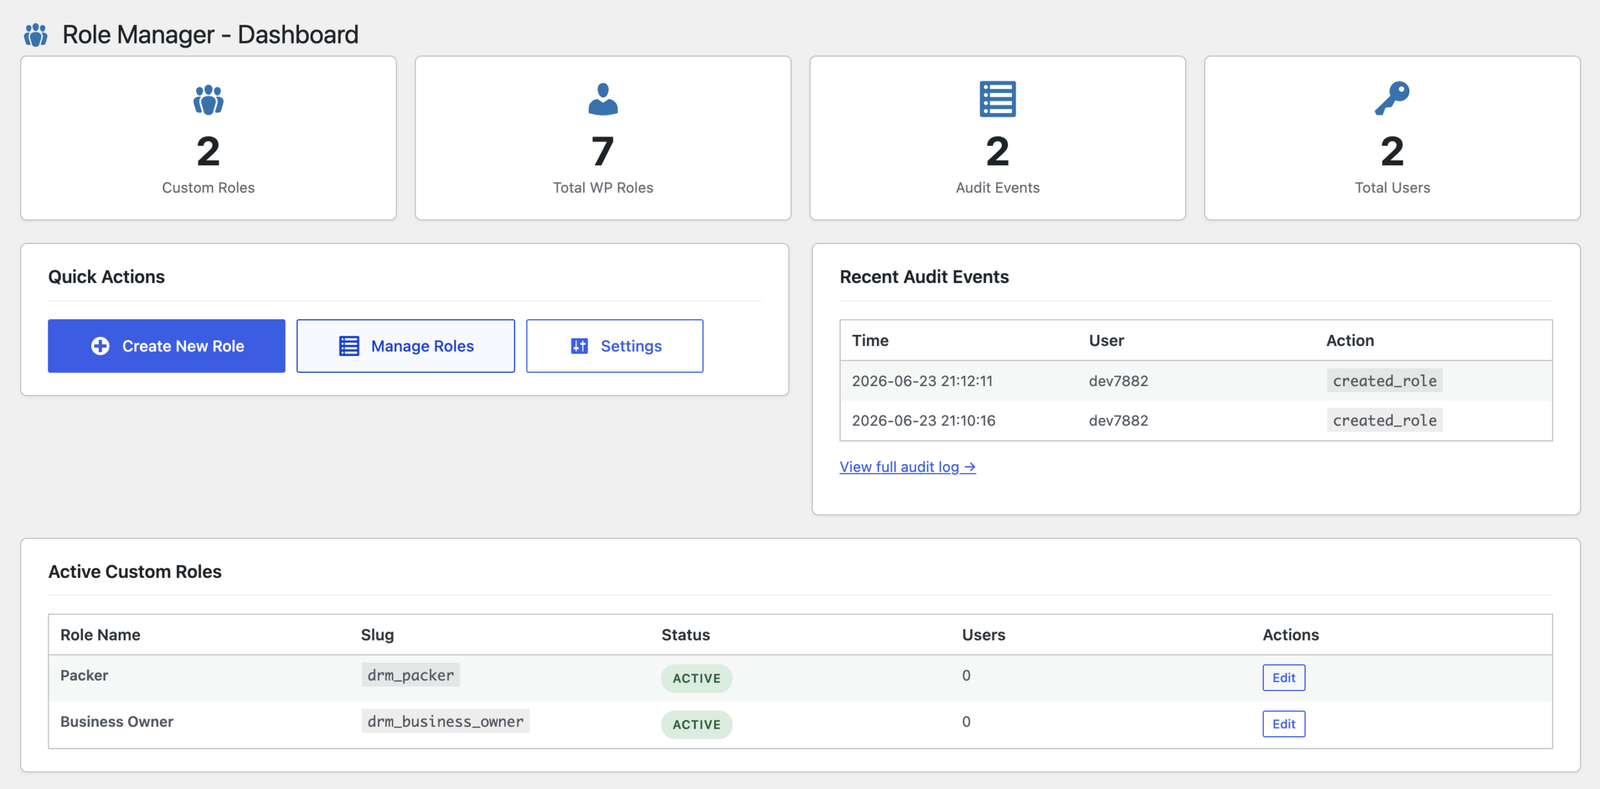
Once activated, Role Manager appears in the left-hand WordPress admin sidebar. From there, you can access the dashboard, create roles, manage existing roles, and view the audit log.
Creating the Store Manager Role
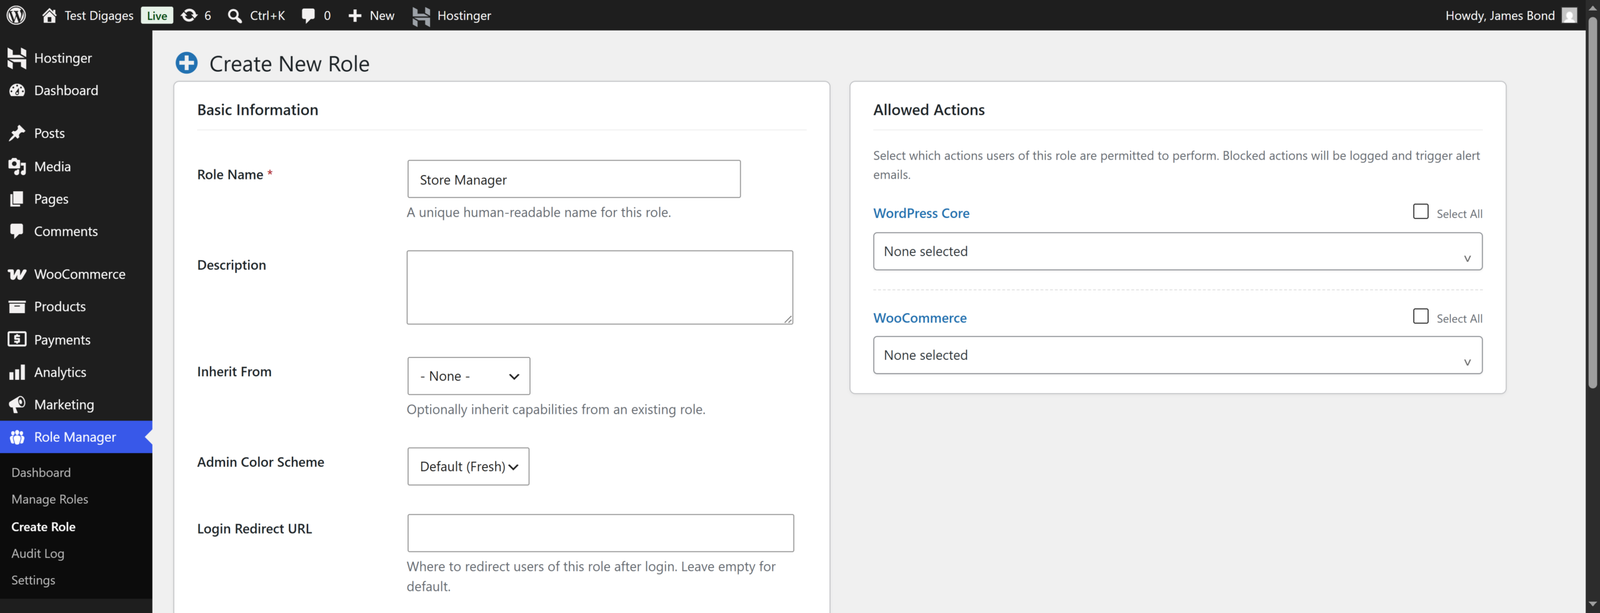
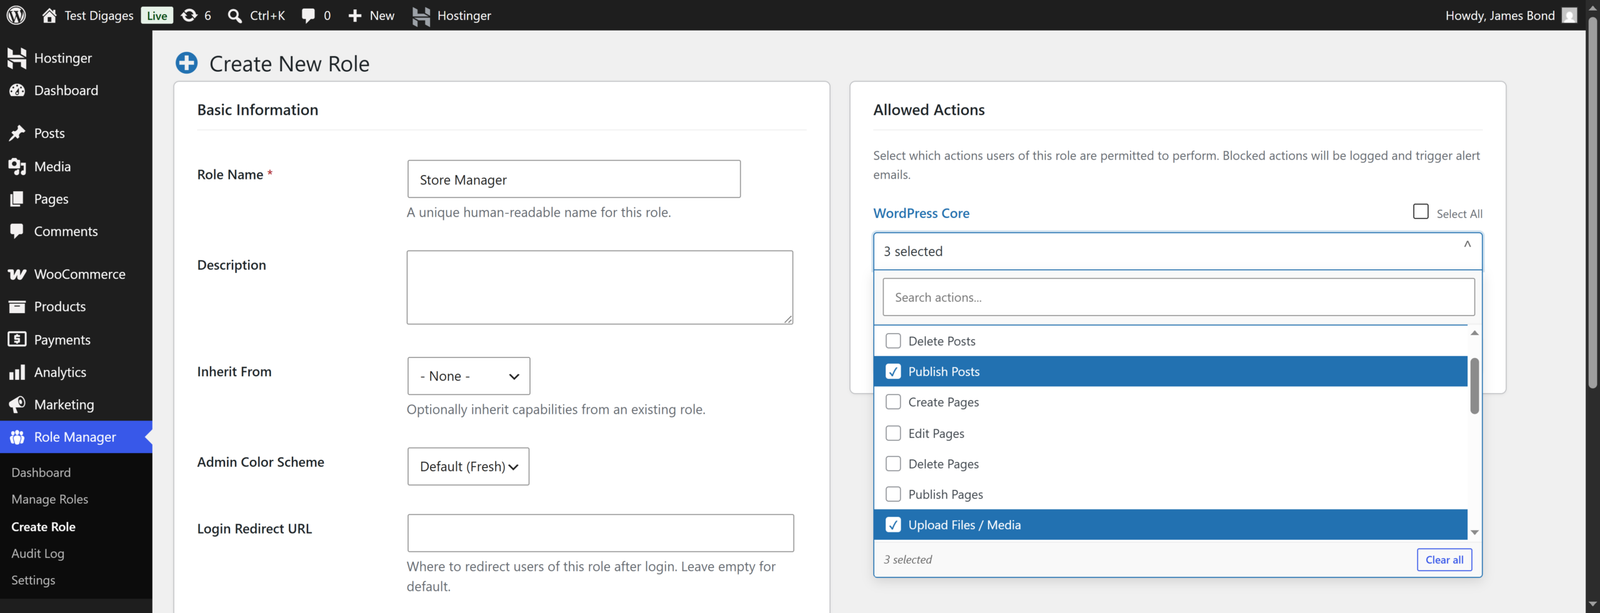
From the Role Manager dashboard or the sidebar, click Create New Role. This opens the role configuration screen where you will define the name, capabilities, and menu access for your new role.
Basic Information
Fill in the fields in this section as follows.
For the Marketing Manager role:
- Role Name: Store Manager
- Description: Senior store operations staff member responsible for day-to-day store management, including orders, products, coupons, customers, and reports. Restricted from payment, tax, and shipping configuration, plugin management, and user administration.
- Inherit From: Shop Manager, it gives the full day-to-day WooCommerce operational capability set pre-selected (orders, products, coupons, customers, reports), avoiding the need to manually rebuild WooCommerce’s most complex capability list from scratch.
- Admin Colour Scheme: Leave as default.
- Login Redirect URL: Leave empty.
Inheriting from Shop Manager pre-selects a large, complex set of capabilities. Don’t skip the remaining sections, assuming the defaults are already correct. Shop Manager also includes full settings access, which you’ll restrict using Admin Menu Access rather than by removing capabilities.
WordPress Core Capabilities
This section lists every WordPress capability that can be assigned to a role. Because we inherited from the Shop Manager, a small set of core capabilities will already be selected. Shop Manager itself does not need most of WordPress’s core capabilities.
For the Store Manager role:
Check the following capabilities:
- Edit Posts
- Publish Posts
- Upload Files
Leave the rest unchecked
WooCommerce Capabilities
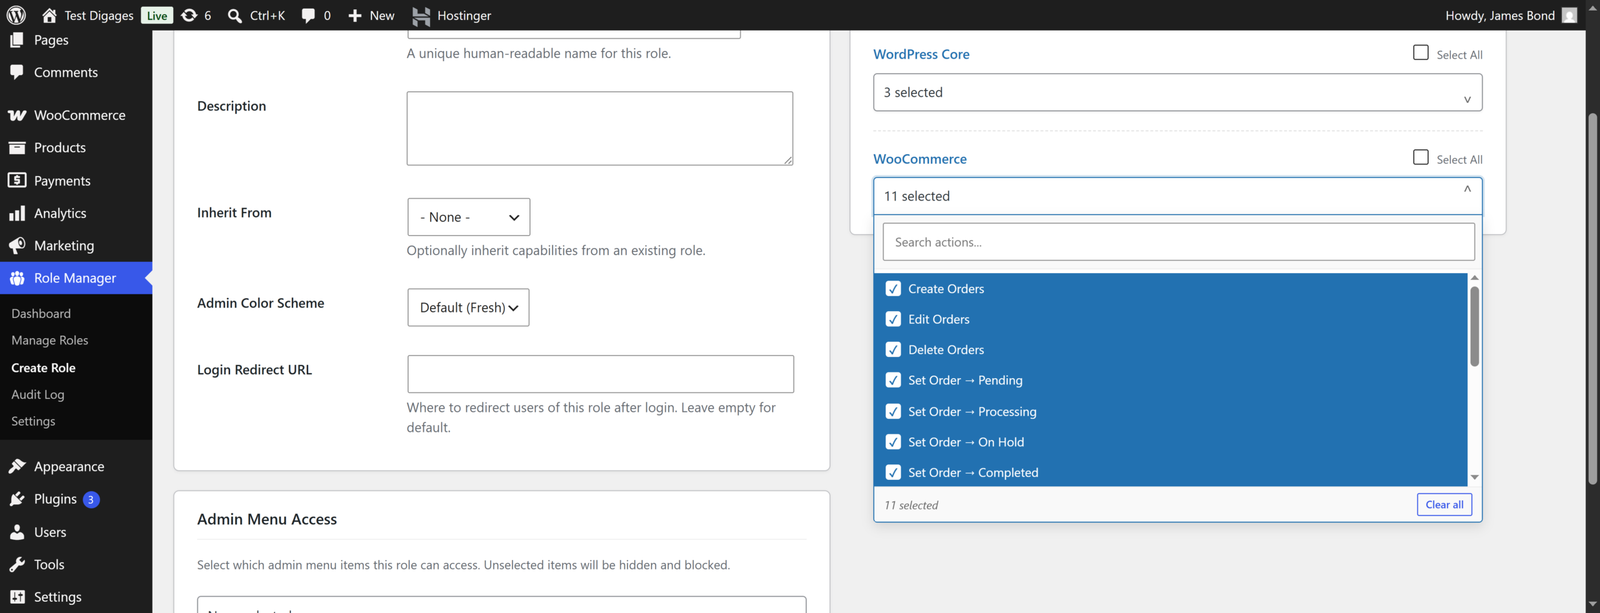
This section appears when WooCommerce is active on your site. It is where the actual inventory work happens: product editing, stock control, and reporting.
WooCommerce Capabilities
Tweak this section when WooCommerce is active on your site. Shop Manager’s WooCommerce capability set is extensive; it covers the full operational range a Store Manager needs.
For the Store Manager role:
Allow these WooCommerce items:
- Create Order
- Edit Order
- Delete Order
- Set Order > Pending
- Set Order > Processing
- Set Order > On Hold
- Set Order > Completed
- Set Order > Cancelled
- Set Order > Failed
- Create Products
- Edit Products
- Delete Products
- Manage Coupons
- Manage WooCommerce Settings
- View Reports
Admin Menu Access
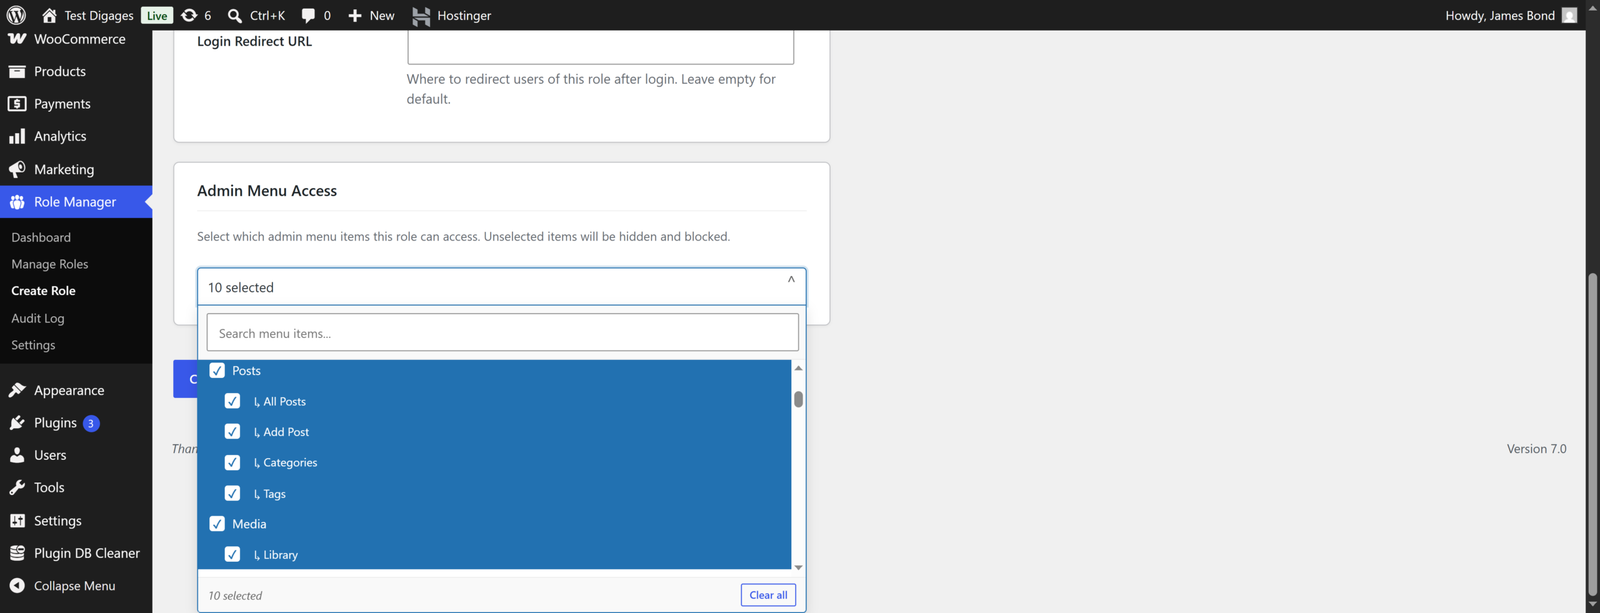
This section controls which items appear in the WordPress admin sidebar for this role independently of the capabilities granted above. This is where you hide the WooCommerce Settings screens without affecting the role’s ability to manage orders, products, coupons, or reports.
For the Store Manager role:
Allow these admin menu items:
Dashboard;
- Home
- Updates
Posts;
- All Posts
- Add Posts
- Categories
- Tags
Media;
- Library
- Add Media File
Woocommerce;
- Home
- Orders
- Direct Payments (If Active)
- Customers
- Coupons
- Reports
- Status
Products;
- All Products
- Add New Products
- Brands
- Categories
- Tags
- Attributes
- Reviews
Analytics;
- Overview
- Products
- Variations
- Categories
- Coupons
- Stock
Saving Your Role
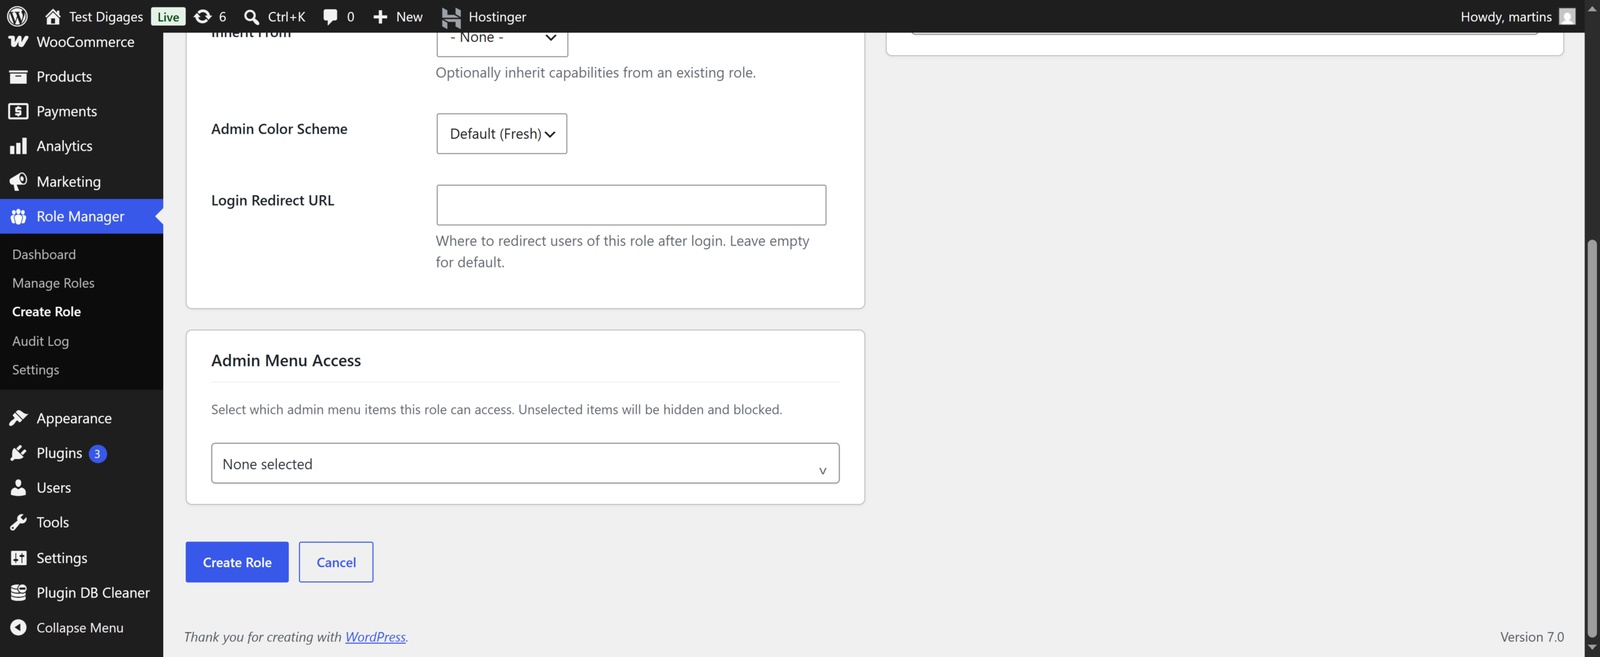
Once you have configured all three sections, Basic Information, WordPress Core Capabilities, and WooCommerce Capabilities, scroll to the bottom of the page and click Create Role.
The Inventory Manager role will now appear in the Manage Roles screen and on the Role Manager dashboard. It is immediately available to assign to users.
Managing Your Custom Roles
The Manage Roles screen lists all roles on your site, including the ones you have created with Digages Role Manager. For each custom role, you can:
- Edit: modify capabilities, menu access, or basic information at any time.
- Disable: temporarily deactivate the role without deleting it. Users assigned to it will lose their access until you re-enable the role.
- Delete: permanently remove the role. Assign an alternative role to any users before deleting.
Digages Role Manager includes an Audit Log screen that records changes made to roles. Use this to track when capabilities were added or removed and by which administrator.
Connecting Role To A User
Once your custom role has been created with the correct permissions, you need to link it to the actual staff on your site. You can do this by either updating a current staff member’s permissions or setting up an account for a new hire.
Edit an Existing User
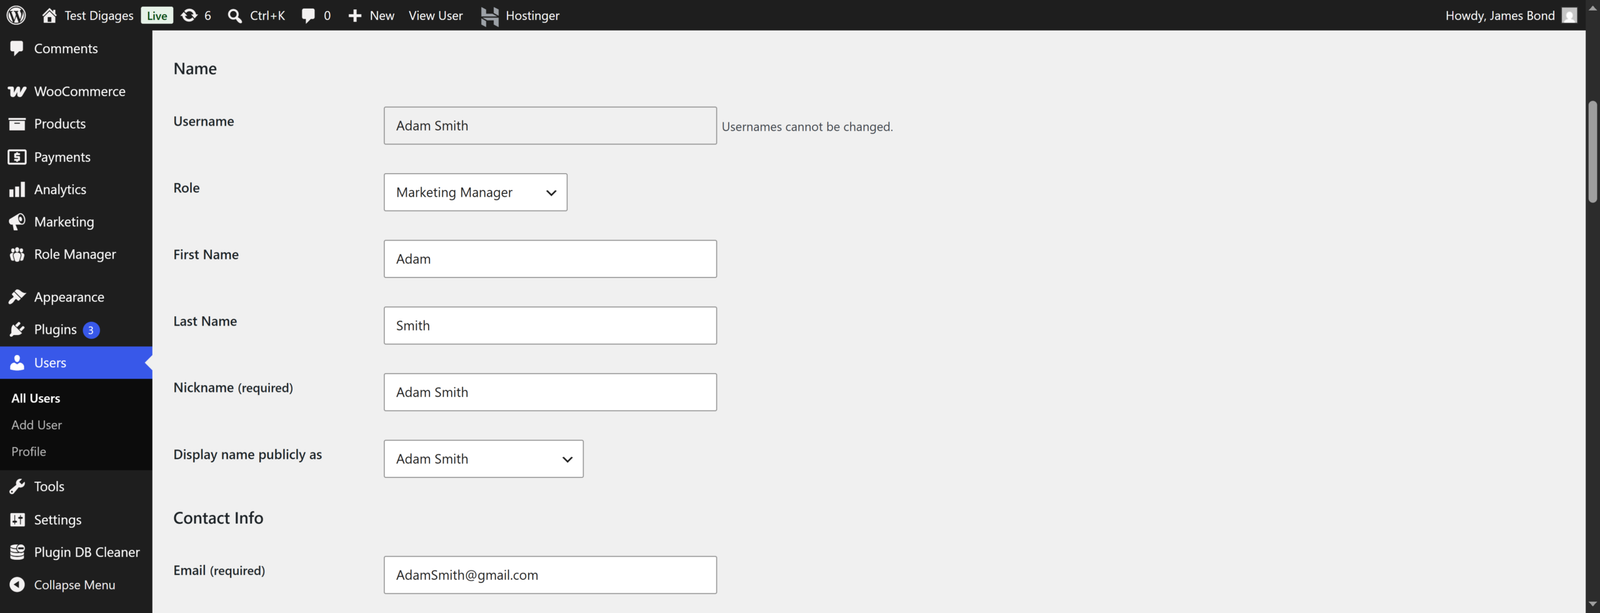
If you already have a team member registered on your site and want to change or upgrade their permissions to the new role, follow these steps:
- Navigate to Users > All Users in your WordPress dashboard.
- Find the team member you want to adjust and click Edit.
- Scroll down to the Role dropdown menu.
- Select your newly created custom role from the list.
- Click Update User at the bottom of the page to save the changes.
Creating a New User
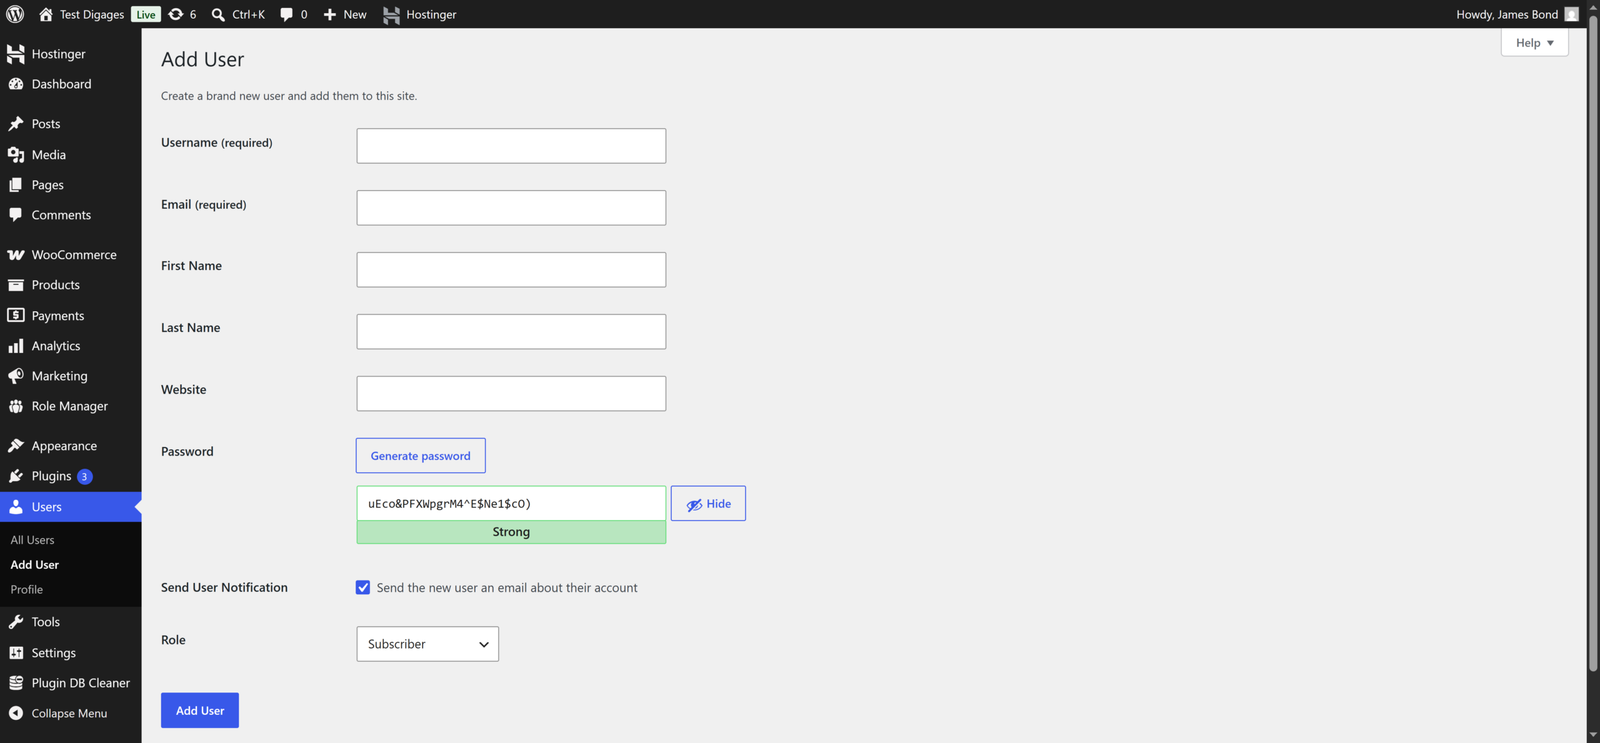
If you are onboarding a new team member specifically for this support position, you can assign them the role from scratch:
- Go to Users > Add New User in your WordPress dashboard.
- Fill out the required details, including their username, email, and password.
- Locate the Role dropdown menu near the bottom of the registration form.
- Choose the new custom role to ensure they only receive access to relevant support features.
- Click Add New User to finalise the creation and automatically apply the role.
Conclusion
Role Manager makes it straightforward to go beyond the default WordPress role system. By creating custom roles with specific capabilities and controlled admin menu access, you can give every team member exactly the access they need and nothing more.
Whether you are running an e-commerce store, a membership site, or a content team, well-structured roles help you keep your WordPress site secure, organised, and easy to manage.
After setting up a role, if you need to adjust the role later, tighten or expand access, return to Role Manager → Manage Roles, click Edit next to Content Editor, and update the capabilities. Changes take effect immediately for every user assigned to the role.
Read the Settings article here to learn how to configure audit logging, alert emails, and other plugin-level settings.